Showing posts with label simplifying shopping list. Show all posts

Friday, February 25, 2011

Homemade Yogurt in the Crock Pot!

Boy, have I learned a lot in the past 48 hours or so! First of all, I've been back and forth about whether to bother making my own yogurt or not because all the recipes that I could find that were supposed to be "easy" did not look so "easy" to me! Why? Because checking the temperature and keeping it just right for hours is something that this "global" mom would never be able to stay on top of. Yes, I always have multiple things going on at once but that level of attention to detail is beyond my ability and makes me nervous! I would have to stand there the whole time. I would never remember to check otherwise. I know that you can get a system down with trial and error and find a way to incubate yogurt without having to check, but I was dreading the trial and error and all the potential waste of milk and time in the process. I even have my mom's old yogurt maker that works really well, but we go through it SO FAST that I would have to make it so often since that makes a pretty small batch compared to what we use.

I saw a recipe once for making yogurt in the crock pot, but so many of the comments were negative, saying that it had come out runny, that it discouraged me. I lost my motivation.

Until this week. The fact that we go through yogurt so fast had gotten me thinking about really doing this some way in which I can make bigger batches.

Then I discovered, "A Year of Slow Cooking." I know, I know, I'm way behind the times, but I'm SO excited! That blog will become one of the three cookbooks I'll be using for a year starting in April. (I'll share the other two in a later post.) Stephanie's enthusiasm and results along with the many positive results shared in the comments motivated to try this, and as she would say, "It works! It really really works!"

My daughter and I enjoyed the tastiest most perfectly textured yogurt today that I have had in a long long time...if ever!!!!!!!!! THANK YOU STEPHANIE! My fingers aren't quite shaking, but I'm very very excited, which is why I'm writing this post right now when I should be doing a lot of other things!

I won't repeat all of Stephanie's recipe, you can just check it out here. I will describe how I "sorta kinda" adapted it.

1. I heated a half gallon of whole milk on low fro 2.5 hours as the recipe called for.

2. The next step was to unplug it and let it sit for three hours. I didn't exactly follow this because I have the thermometer that goes with my mom's old yogurt machine that is perfect for global folks like me and doesn't even have numbers! It just has an arrow signaling, "When the temperature is here, mix in the starter!"  Love it!

Therefore, I took off the lid and let it sit a while and checked a couple of times...not sure how much time went by, I think it was about an hour, but the temperature was just right the second time, so I scooped out two cups of it into a separate bowl and mixed in a half cup of store bought yogurt.

3. Then, since I knew it was at the perfect temperature, I put the lid on the pot and wrapped that sucker in TWO HUGE towels as airtight as I possibly could, because I knew it needed to not get any cooler.

4. Then I just forgot about it. The this morning, around 7:30, I remembered. I hadn't been in the kitchen yet because my dear husband brings me a mug of coffee as I stagger to a chair in the living room in the mornings where I remain with my coffee until Lydia wakes up and/or I remember that yogurt is incubating on the counter! For this reason, it was incubating for about 12 hours. I'd meant to leave it for only 10.

When I opened it up I saw clumpy yogurt with liquid separating it a little. I was excited because I knew this meant "not soupy." Yay! This was after stirring a tad:
 

This is where I reveal what a rookie I am, but it wasn't until yesterday that I learned that you call that "liquid" whey. I had tried to print out Stephanie's post, forgetting there were 400+ comments, and needless to say, it ran out of paper before even finishing the comments. I did scan the comments and that is where I learned what whey was and that you could use it for other things, like baking bread.

I did a quick search on uses of whey and got some great information really quickly. I knew I wanted to get some of that whey out for a bit thicker consistency of yogurt, so first I tried using our coffee sieve and scooping out a bit at a time and letting the whey drip off. I quickly learned that this was not going to work.


I thought I needed cheese cloth but I tried using one of our buffet style cloth napkins that we use as kitchen cloth because it is thin. I wet it, wrung it out, and laid it in a colander which I sat on a bowl. I emptied the crock pot of yogurt into the colander and sat it in the fridge for an hour or two. I know that's a broad range, but that's just how I work.


I was so excited when I pulled it out. The yogurt was just right, and I had about 2 cups of whey. Exactly the amount that I needed to substitute whey for water in my easy homemade bread recipe (which I'll be posting some tips on soon).  I learned from my earlier search that using it instead of water to prep the yeast would make the bread moister and add some protein. I'm excited about all of the potential uses of whey, a great list of which you can find in this discussion on Chow Hound. It led me on a search about how to make mozzarella cheese, which I might just try after our trip to Brazil!


So finally I had a big bowl of yogurt in the fridge and a nice bit of whey on top waiting for the bread baking, which happened to be today since we just ran out.


I was distracted and left out a couple of important steps in the bread making and we were short on yeast. It's cooling now, but I don't expect the results to be stellar. I will try again and let you know how it turns out!

All in all, I can see this EASILY becoming a weekly routine! Set milk in the crock pot  on low for a couple of hours around dinner time. Take the lid off and let it cool, keep check, but it should be ready in an hour or so to mix in a tad of last weeks yogurt. Then wrap it up in two towels and forget about it until the next morning. Save the whey and make bread for the week as well. LOVE IT!!!!!!!!!!!!!!!!!!!!!!!!!!!!!

Scratch yogurt off my grocery list! Woo Hoo!!!!

Friday, February 18, 2011

Easy {Two Ingredient} DIY Wrinkle Releaser!

Ironing is problematic with a toddler on the loose! I have a really hard time remembering to turn off an iron...even before Ellie came along! Thank God for the automatic shut off! I *rarely* am there to get clothes out of the dryer as soon as they are finished. Laundry is going on during the midst of many other things! I also have a hard time doing ironing all at one time because I usually have multiple chores going on at once. It's just the way my brain works and I'm learning to work with my personality, not against it!
The fact that an iron may be set up for extended times, and that though I *intend* to close the door to my bedroom when the ironing board is set up and Ellie is playing in the hall while I shift laundry, sweeping, or  -you name it-, I cannot trust myself to remember. That's just a fact! Therefore, I was super excited when I saw this post on Somewhere in the Middle via the Raising Homemakers' Wednesday link up a few weeks ago.

Turns out that one teaspoon of liquid fabric softener per one cup of water in a spray bottle equals perfectly effective wrinkle releaser, fabric relaxer, whatever you want to call it! I used to buy this stuff during my single overly busy teaching days, and I have to admit, I almost feel silly using it! I feel a bit lazy, but now that we have a toddler around, I do think it's a pretty handy thing!

When I pull the clothes out of the dryer (wrinkled, of course), I'm spraying, stretching, and shaking out the shirts that matter and hanging them separated so that they can dry. Voila! 

As I've been getting out wrinkled summer clothes to pack for Brazil I've realized that taking a bit of this along will really come in handy as well since ironing will be out of the question!

I bought a spray bottle and liquid fabric softener at Dollar Tree. However, the spray bottle only shoots a single stream of liquid, so I had to use a different one. In the future, I will also look for a fragrance free fabric softener because we are not used to smells and it's a bit overwhelming!

*Image Courtesy of The Graphics Fairy.

Tip Junkie handmade projects

Tuesday, February 15, 2011

A 'More With Less' Valentine

Both my daughter and I are dealing with pretty bad colds, and were unable to go anywhere on Valentines day. My hubby and I aren't really big holiday people in that we don't think about them very well in advance. We love giving gifts and cards but tend to enjoy it more spontaneously than due to established holidays. For that reason and because Lydia and I have been sick, we had no plans, no cards, no gifts, 'no nothin' for Valentines day.

I had a surge of energy before Tom came home for lunch and wanted to make him something sweet. The cupboards are pretty bare as it's time to re-stock on some essentials, but thanks to More With Less cookbook, I was able to throw together  a couple of sweet (but not too sweet) treats.


 The first was "Date Oatmeal Cookies" on page 286. We don't keep dates around, but we did have some raisins and made them Oatmeal Raisin Cookies. We had all the essential ingredients and they came out yummy. At first they were looking questionable when I peaked into the oven so I made a back-up of some "No-bake Cereal Cookies" on page 287 with rolled oats in place of the dried flake cereal.

I made two very last minute cards with card-stock and crayons. One for Lydia to scribble on and one from me. Lydia's got taped to the door for Daddy's (aka "dah tee") arrival. It was the first time she'd held a crayon or scribbled! Double special!


It was simple and fun and didn't' require buying anything we didn't have! Thank you More With Less!!!!


Wednesday, January 26, 2011

Very Easy {Two Ingredient} Homemade Liquid Handsoap

A while back I wrote about how using bar soap over body wash for bathing helps avoid waste, saves money, and saves unnecessary packaging. I guess this is again where the "choosy" wins out over the cheap, because when it comes to hand soap, I prefer liquid. I don't like the  grunge that inevitably builds up on the soap (or so it always seemed at my grandparents' house growing up).

I read on a forum somewhere a few months back that you could make your own liquid hand soap by grating up a bar of soap and boiling it in 6 cups of water. I finally got around to trying it last week. I was concerned when I "Googled" it because I almost always saw glycerin as an essential ingredient in most recipes. If you follow my blog you know I like things uber simple with as few and as "common" ingredients as possible. Glycerin is very cheap and would last a long time though so I'm not knocking it. However, since I didn't have it around, I asked a fellow blogger if it was necessary and discovered that if you use regular bar soap, rather than castille soap, the glycerin is not needed because it already has it.

It worked REALLY well, and was simple enough to make it worth doing again. I was treating it as an experiment, and doubtful that I would do it regularly because of time constraints, but I definitely will continue because it's very easy to do while cooking dinner or any time for that matter. Here's how:

1. Grate bar of soap. (I used Ivory because that's what we typically have around.)


2. Bring 6 cups of water to a boil and add bar soap. Stir until soap is dissolved.


3. Turn off heat and let cool for 15-30 minutes or long enough to be cool enough to put in soap dispensers.


4. Put in dispensers and let sit until it thickens up. With Ivory it turned a whitish color.


Scratch liquid handsoap off my shopping list! Yay!

*Added Note, 2/18/2011
When I went to make another batch of this I realized that a good bit of soap was still clumped together in the dispensers. I just added a bit of warm water to each one and shook them up and they started shooting out soap again, a bit more liquid, but plenty of soap to do the job!


Tip Junkie handmade projects

Friday, January 14, 2011

Homemade Ranch Dressing: Good News for the Tastebuds, Not so Good for the Waistline

Do you love Ranch dressing, but would like to know what's IN your Ranch? You can make your own just about as quickly as you can whip up a batch out of a pre-prepared packet!

Some time back, I posted about my deliverance from my Ranch dressing addiction brought about by an equally yummy homemade olive oil and garlic salad dressing. That was all well and good until recently.

We had baked chicken the other day, which made me really crave some Ranch because I LOVE it for dipping baked chicken in. I decided to look on line and see if there was a recipe for homemade Ranch. I was doubtful, but my husband told me that there was. He follows Hallee Homemaker's blog and had seen it there.

I went and found it and within 10 or 15 minutes, had a cup of the most delicious Ranch Dressing I'd ever tasted! That's how quick and easy it is, and yes that means you don't need fancy ingredients because obviously we already had everything needed!


I couldn't believe it was that simple. Now I'm really happy because if God ever calls us to another country, I can make Ranch Dressing! I've already shared it with one friend living overseas and plan to share it with more. That is so exciting to me. Yay!

 Here's the recipe:

⅓ cup mayonnaise
⅓ cup plain yogurt (or sour cream)
⅓ cup buttermilk (I just use whole milk because that is what we keep around)
¼ tsp salt
¼ tsp fresh ground black pepper
¼ tsp garlic powder
¼ tsp onion powder
½ tsp dried parsley flakes
½ tsp dried dill

Stir it together and store in whatever you please. Chill and serve on whatever you fancy. :)

Yum!

Tuesday, January 4, 2011

Homemade Macaroni and Cheese on the Stovetop


 *Disclaimer: I realize this is nothing new to the rest of the world, but please humor me. I began this blog originally by logging my experiences in learning to make things myself that I was used to buying pre-made. It's a little challenge I've been enjoying. Please don't think badly of my mother. I wasn't the least interested in these things as a kid and didn't pay attention. It's not her fault! :)
 
 I spend time with my friend Rachel on Thursdays, and the last time I was there, she made some mac' n cheese with...you won't believe it...CHEESE! I was pretty excited because I hadn't seen it done that way, that I *remember.*

Yet again, I was surprised to learn how to make something simple from scratch that I'd only ever known to come out of a box. I must say, my mom did make homemade macaroni and cheese when I was a kid, but it was in the form of a casserole, and I never thought of it as an option for a quick, stove top meal.


I haven't got measurements because she just eye balled it, and so did I. It's pretty hard to go wrong.

1. Start about 2 cups? of macaroni noodles boiling.
2. In a saucepan, melt 2 or 3 tablespoons of butter.
3. Add about 2 cups of shredded cheddar cheese.
4. Stir in "a little" milk (sorry for the vagueness.)
5. Continue cooking and stirring on medium low heat until blended.


6. When I realized I was just making a white sauce with cheese, I added a tablespoon of flour to thicken it a little.

7. When noodles are done, strain them and then mix them into the sauce.


This is where the "choosy" wins out over the "cheap," because cheese is expensive. That's why I'll just make this every once in a while. I'm not at all opposed to a good ol' box of Kraft Mac n' Cheese every now and then either. I'm just glad to know I can do it myself. This way a comfort food becomes a healthy food...relatively speaking.;)

Scratch boxed Mac n' Cheese off my grocery list!

Friday, December 10, 2010

Swiff and Fluff on the Cheap!

 As we have all hard floors I had become quite a fan of the Swiffer Sweeper. I also used the Swiffer cloths for dusting. We went through them very quickly until some time ago I saw an article on the Diaper Pin about using microfiber cloths (typically sold the auto section of most department stores) in the place of disposable Swiffer sweeping cloths.

This is my most recent microfiber towel that I haven't cut yet.
While at a discount store I picked up a super cheap microfiber cloth and tried it out. It was amazing, doing exactly what the Swiffer cloth did only...it was reusable! I just shake off the excess dust over the trash can and then toss the cloth in with the dirty towels.


The microfiber cloth was a little large for my purposes so I cut it in half and did not sew the cut side to see if it would fray and after washing it for months, it has not frayed at all!

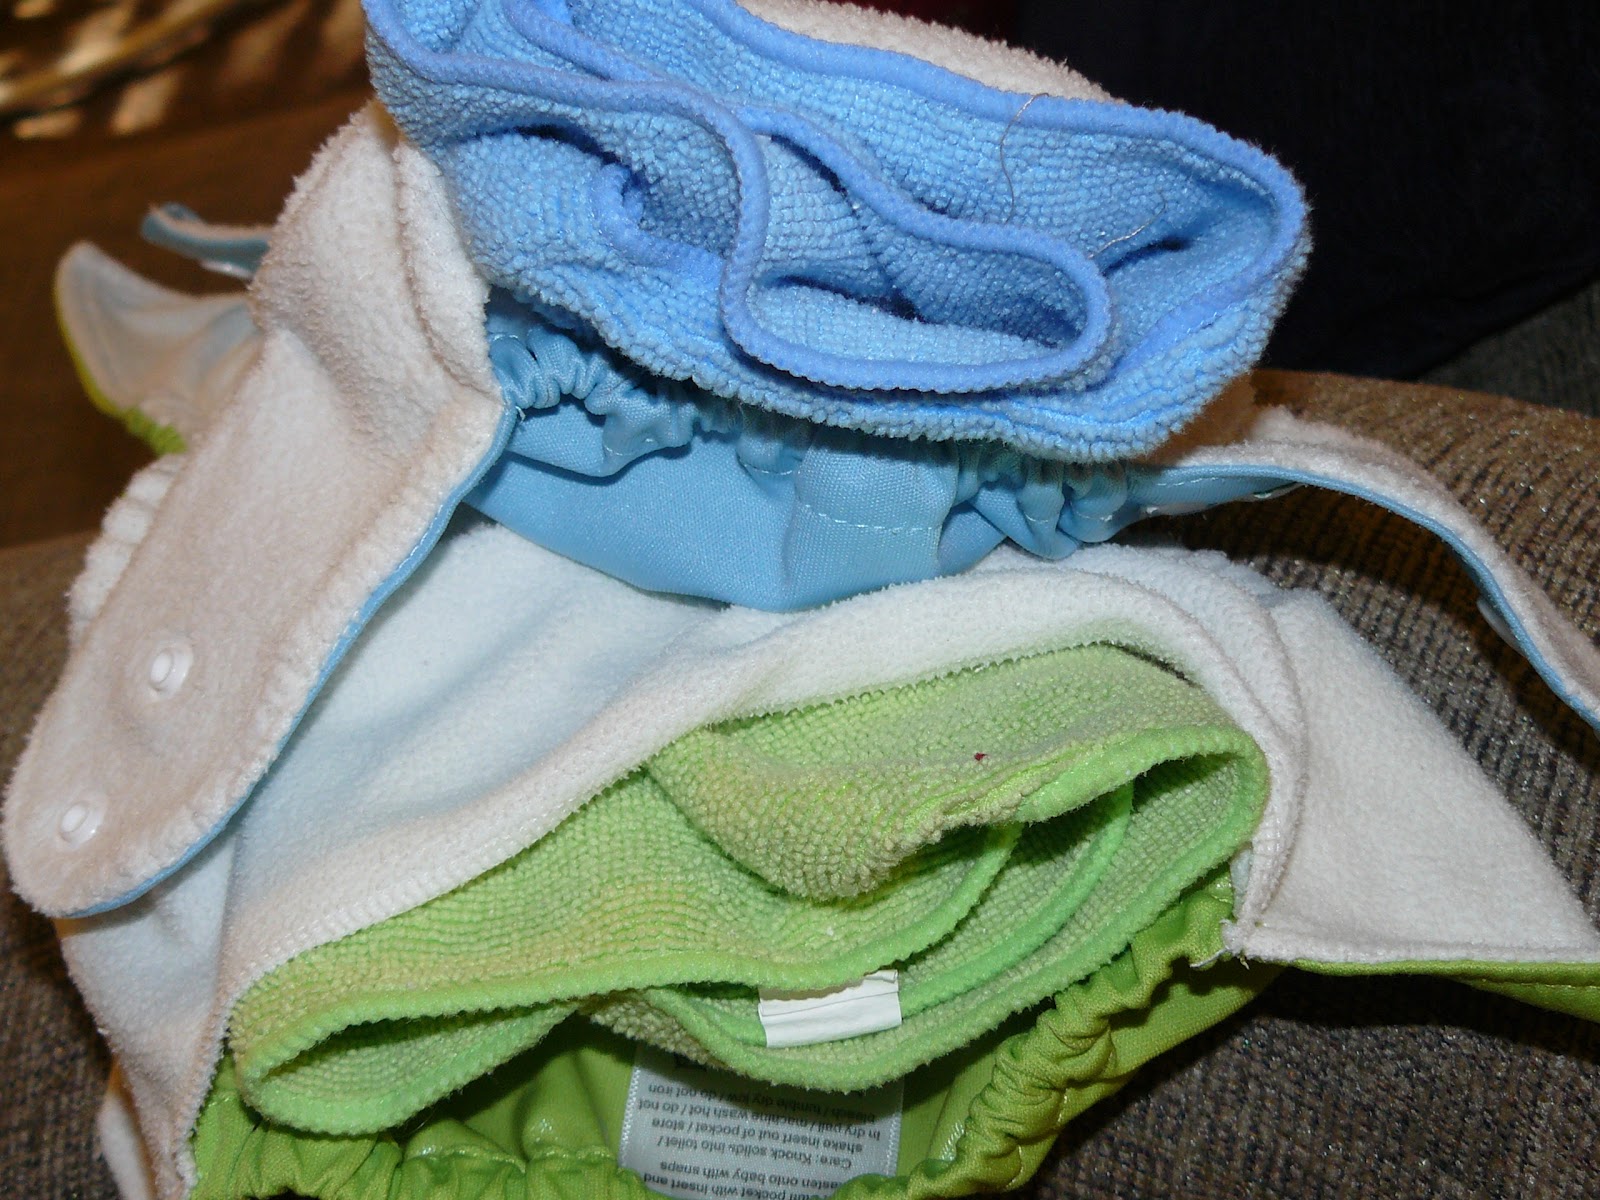
Later, I received a Nykibaby One Size pocket diaper for review from Monkey Toe Diapers that came with a microfiber towel as an insert. I discovered that it was a very absorbent and trim insert. I didn't even realize how cheap the towels were at the time, but was seriously hoping to find more to use as inserts!

I didn't have to wait long! On a recent trip to Dollar Tree and discovered that they have microfiber towels for a dollar each!


I snatched up a few white ones for dusting and sweeping and a few pastel ones for stuffing and fluffing my pocket diapers. They work SO well and are so cheap. PERFECT for adding serious extra absorbency to an overnight diaper!

And yes I did match them on purpose...pitiful I know! I also have a purple diaper and a purple cloth but it was dirty! :)


Thank you Dollar Tree!!!!!!!!!!!!!!!!!!!!!!!!!

Monday, December 6, 2010

Easy Improv: Creamy Italian Chicken


I've mentioned before that one of the most helpful things I've learned from More With Less cookbook is how to make a simple white sauce, thick enough replace condensed cream of ____ soup, or thin enough to be soup. We have chopped chicken frozen in one cup portions in the freezer and I was feeling like something creamy. We also had macaroni noodles. In the past, a craving of creamy pasta led to the opening of a box of Pasta Roni! But now that I know how easy white sauce is, that didn't even occur to me!

I'm pretty excited because this "throw together" meal ended up being a new recipe! The impulsive tossing in of slivered almonds really set it off! This is huge because I am not a cook. I've been learning to cook, and using More With Less as my guide since it's simple and from scratch.

As a matter of fact, I'm pretty sure this is my FIRST "original" recipe! (Though influenced inspired by similar things in More With Less.)

My new recipe is hereby dubbed:
"Creamy Italian Chicken"


 Here's how to make it:

1. Put water for pasta to boil and continue with recipe, but add pasta and boil when ready.
2. Melt 2 TB of butter in a saucepan.
3. Add a crushed garlic clove, 1/2 tsp of salt, and basil and oregano as much as desired.
4. Stir in 2 TB of flour until it's all mixed.
5. Stirring with a wisk, add about 2 cups of milk.
6. Keep stirring at medium heat until thickened. (You can add milk if you want it thinner.)
7. Add 1 cup of chopped or pulled chicken.
8. Add a half cup or so of slivered almonds.
9. Drain Pasta and put in serving dish or dishes.
10. Top Pasta with chicken mixture.
11. Garnish with dried Parsley and/or slivered almonds.


I used to be a Pasta Roni Aholic!  But now... who needs it???? Seriously, this was just as easy to prepare, and much better!

 Scratch Pasta Roni off my grocery list forever!!!!!!!!!! ( I told you there would be more :)

(It's been a while so if you're new here you can click on my "cooking from scratch," and/or "simplifying" button on the left to see more things I've enjoyed scratching off the list!)

Monday, September 6, 2010

So Long,Pillsbury! {Menu Plan Monday}


By the time I finish this post it may become "Menu Plan Tuesday" as I'm busy trying to adjust to life with a crawler and no more morning nap (unless it's just the teething).

I will continue with Menu Plan Monday, because my family needs to eat, and it provides a motivation and accountability to sit down and plan out meals and make a grocery list accordingly. This prevents a ton of stress for the rest of the week. Otherwise, you would find me around 5:00 or 5:30 p.m. with my usually by then tired baby (and all that that implies), scratching my head, looking into the fridge and pantry asking myself, "What in the world am I going to cook for dinner?" Then, hubby would come home to a frazzled frustrated wife and no hope of dinner anytime soon. He's so sweet that he would not complain or criticize, but I'd be frustrated and as we all know, that's not a fun state to be in.

Oh and about that grocery list made according to my menu plan...have I mentioned that my grocery list is SOOOO simple thanks to More With Less Cookbook? The simple list of things we get weekly or bi-weekly covers many many recipes in the book. At most I get one or two things a week that I buy with one specific recipe in mind, and usually can use it for a few other recipes too. The rest are staples that go in a variety of recipes...and did I mention that they're mostly low cost ingredients as well? Just Sayin'...

I believe I have mentioned that before More With Less, I could barely cook. That is not entirely true, but my list of recipes that I felt confident about was very short, ie maybe 4, and most of them, if not all, involved some pre-made food or another as a main ingredient.

One of the recipes that I loved and served to everyone who came over for dinner at some point (sorry friends if you had it twice...or..thrice...or...yikes!) is affectionately known to us as "Chicken Crescent Rolls" or to our Spanish or rather Spanglish speaking friends as "Bolitas de Chicken."

It was passed on from a family friend, and may have originally come from the back of some some Pillsbury product or another because the essential ingredient was Pillsbury Crescent Rolls.

Do you know that it never occurred to me that I could make the dough myself? I remember thinking many times, "What would I do if we moved to another country? I wouldn't be able to get Pillsbury Crescent Rolls!" It's sad I know, but it's the truth.

Then one day, I was looking through...you'll never guess....More With Less Cookbook, and I found a recipe that looked very similar to my beloved Chicken Crescent Rolls, except...wait a minute...you use biscuit dough? Don't tell me they're just basic biscuit dough! But, sure enough, that turns out to be the case and I realized that you don't need some fancy recipe or ingredients.

So, I finally got around to trying Chicken Not Crescent Rolls without buying refrigerated dough! And guess what? It was easy! I spent about 5 minutes making the dough and maybe 2 extra minutes rolling it out. I dirtied about 2 more dishes, and felt no worse for the wear.

Here are some way overly processed pictures of the experience. I got a little carried away with Picnik. (It's so much fun!) The food may be less processed but the pictures definitely are not!

Here's the ball of dough I prepared first and put in a bowl in the fridge while I got everything else ready.


While doing this I had some chicken boiling, and then chopped it up. I used about 4 breasts. I was going to save some aside to freeze in 1 cup portions for other recipes, but forgot. So we ended up with LOTS of chicken balls!


Then I mixed in half a bar of cream cheese, a dash of salt, a dash of pepper, and a bunch of dried oregano and basil


Next I rolled out the dough and used a mug to cut circles. We don't have cookie cutters so I always use cups or bowls. They work great and offer a pretty good variety of size options! Yay for things you don't really need!!!


Then I grabbed a ball of the chicken mix and placed it in the middle of one of the discs of dough and wrapped it up. I found it actually easier to work with and stretch around the chicken than the refrigerated dough! In the background you can see the bowl of melted butter and the bowl of homemade italian breadcrumbs that I roll the ball in once it is formed.


Finally I ended up with two 9x9 baking dishes full of these yummy things.


With the store bought dough, you cook it for 25 minutes. I found that these needed a bit longer. I forgot to set the timer so I'm not sure how long. We just went based on the look. Next time I'll start with 30 min. and go from there.

So, Scratch Pillsbury Crescent Rolls off my list...FOREVER! Yay!

This week.....

Monday: Chick Fillet :)
Tuesday: Homemade Pizza
Wednesday: Pakistani Kima (pg. 131, More With Less) (We tried this last week...Y.U.M. and really quick!)
Thursday: Beirrocks (pg. 144, More With Less)
Friday: Lentil Barley Stew (pg. 107 More With Less)
Saturday: El Burgos (pg. 138 More With Less)

Sunday, August 15, 2010

SodaStream Soda Maker {Menu Plan Monday}

My husband and I really like soda. I know, I know...it's horrible for you. That's why we no longer keep it in our house. We do, however, make excuses for buying a soda about once a week if not more. It's horrible on the wallet that way, but if we bought it by the case we'd drink way too much. Soda is my one consistent frugal failure. Thank goodness for the zero-based budget and envelope system that we learned about from Dave Ramsey (more on that on Frugal Friday), we now have a set limit for even sodas.

Now that you know our weakness, you can appreciate our excitement at winning a SodaStream soda-maker from Michelle at All Home Cooking All Year Long's giveaway! We've been having a blast with it this weekend!


Is it incredibly frugal? No. You do have to buy the flavors when you run out, and replace the bottles and carbonation eventually, but meanwhile you do still come out spending less.

Is it incredibly green? No. However, it will definitely decrease the amount of plastic bottles we would be throwing away. We still have to throw out flavoring bottles and eventually carbonating bottles (they expire every 2 years or so), but we'll be using significantly less than we would by buying sodas.

Is it healthy? Probably not. But the flavors do not use aspartame or high fructose corn syrup, but rather regular sugar and Splenda, and less of it at that. So it is healthier, if you would be drinking soda anyway.

Is it fun? YES! We have really enjoyed trying different favors and being able to make our own soda. I've already made some for guests!

Does it work? YES! The soda tastes great. It's much easier than I thought it would be. It only takes a few minutes to prepare.


So, regardless of frugal or not frugal, green or not green, healthy or not healthy- I STILL get to scratch yet another item off my shopping list! (Not that guilty pleasures actually get on the shopping list officially)...So scratch soda off my mental shopping list!
__________________________________________________________

Now for this weeks menu plan. We have lots of bean sprouts that grew successfully in the colander this week so I'll be using some recipes to incorporate those...

Monday: Kusherie (Egyptian Rice and Lentils) (More With Less, pg. 108)

Tuesday: Quick Chop Suey (More With Less, pg. 133)

Wednesday: Crusty Mexican Bean Bake (More With Less, pg. 101)

Thursday: Leftovers

Friday: Easy Curry over rice (More With Less, pg. 136)

Saturday: Vietnam Fried Rice (with leftover rice from Friday) (More With Less, pg.130)

Sunday: Fellowship then off for Lydia's first visit to the beach! Bojangles or something extremely unhealthy and not frugal will probably be on the menu. :) I'll try to take some things to keep us from buying too much bad food though. :)

Thursday, July 29, 2010

Toiletry Tips Part Three: Adios Facial Scrub!

A couple of week ago I shared about no longer using shampoo, but washing my hair with baking soda and vinegar instead.


Well, we ran out of Aveeno face scrub around that time, and I've been debating about whether to replace it or not ever since. I was really questioning the necessity of special face cleaners. Then one day this week as I was washing my hair with baking soda, I remembered I thought about its abrasive quality. I already use it for scrubbing the sink, pots and pans, and even the bathtub.

I thought I'd try it on my face, not rubbing too hard or too long of course. The results were great! My skin felt so smooth and fresh. I looked it up to find it's a common practice. I did see a couple of people saying it burned if you have an open sore, but I think that would be true for just about anything!

I'm not sure it's best to use any kind of scrub on your face everyday, even though I do it, and I'm sure you should rub very gently, but I can find nothing, on line at least, that gives reason not to do it! This will save money and unnecessary packaging waste!


Scratch face scrub off my list! It's getting shorter by the week!


Find more frugal tips at Life as Mom's Frugal Friday!

Wednesday, June 16, 2010

Homemade Reusable Sandwich Bags

*Update: After initially writing this post I started making these with water resistant ripstop nylon on the inside. It is more food safe and much lighter for an all together better result! I currently use ripstop nylon to make super compact travel diaper changing pads for sale in my Etsy shop, Seams to Streams.*


When I learned of the existence of reusable sandwich bags, I went googling to see what it was all about. I found this blog with a very user friendly tutorial on how to make reusable snack bags yourself. I saw elsewhere (can't remember where), that someone had made a sandwich wrap, but lined it material from a vinyl table cloth instead of PUL.

We had a vinyl tablecloth I was getting ready to get rid of! I preferred the sandwich bag idea over a wrap, so I combined the two ideas. I also had a couple of big pretty cloth napkins that had been given to me for sewing, so I used those as the outer fabric.

How to Make Reusable Sandwich Bags

1. First, I cut equal sized rectangles of fabric and tablecloth. I used an actual sandwich bag for sizing, so that folded in half the rectangles were 1 or 2 inches bigger than a sandwich bag:


2. Next, I placed the two rectangles with the pretty sides in and sewed them together at the ends. Just two straight lines! :)


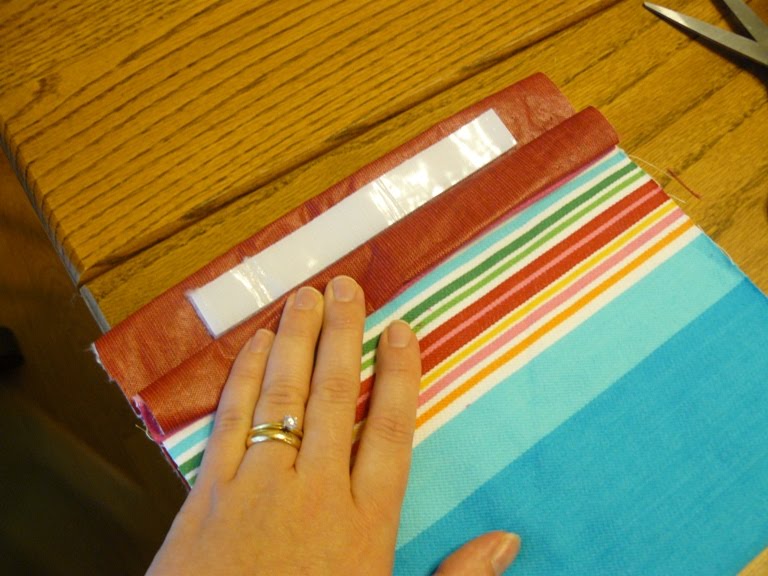
3. Next, I turned the sewn together rectangles so that the fronts were facing out, and put a strip of velcro on the vinyl side, leaving room on the edges for sewing together later. In order to place the velcro accurately without bothering with too much measuring, I went ahead and stuck an equal size piece of velcro right onto the piece I'd already stuck. Than I could fold the material and just unpeel and stick the other side on.


4. I folded the rectangle with the vinyl/velcro side out (inside out), and sewed the two sides together. Just two more straight lines! :)


5. I turned it back, and the job was close to done, but something had to be done about that inner seam if I was going to carry a peanut butter sandwich in this!


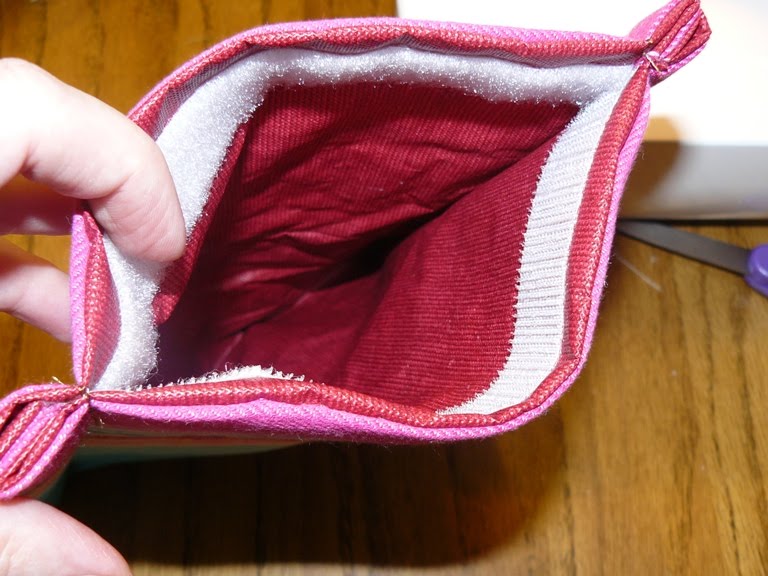
6. So finally I sewed just two more straight lines down the sides with the bag turned right side out to enclose those seams. Here is the final product from the outside:

And from the inside:You can see it is the same size between the seams as a regular sandwich bag:


Just wipe and reuse!I've already tried it. It works great! Of course, you cannot put really hot things in there or heat it.

This has inspired quite a few more "reusable" ideas that I CAN'T WAIT to try! I'll keep you posted. I also found some beautiful "vintagey" fabric at a consignment store that I plan to make more of these with.