Friday, June 18, 2010

Overnight Oatmeal {Soaked Steel Cut Oatmeal}

*Update  as of July, 2012: We still enjoy steel cut oats for breakfast, and it still starts the evening before, but we have found that leaving them on warm in the crock pot overnight is actually a breeding ground for bacteria. We'd been doing it for two years before it ever made us sick. Now we soak two cups of oats with 1.5 TB of vinegar overnight, drain and rinse in the morning, add 3 cups of water again and cook until the desired consistency is obtained. This is safer and more nutritious! You can read why we do it this way here.*

We have for the most part stopped buying prepared cereals (except this week we couldn't resist the two boxes of Chex we got for $.25). I'm trying to make Granola on a regular basis, and our easy homemade bread makes delicious toast. However, the main thing that keeps us having a healthy breakfast on the cheap and with ease is making large quantities of oatmeal overnight in the crock pot about once a week.

There are many opinions about how this is best done. Just Google it and you'll find out. Everyone has a different idea of what the perfect consistency of oatmeal is, and there are many varieties of crock pots. I will share what works for our tastes and our pot! A lot of people put the oatmeal in a bowl inside the crock pot, but ours is too small to make more than an individual serving that way. The reason for doing that however, is that the oatmeal can overcook and get crusty overnight. We don't have that problem with the following method:

Overnight Oatmeal in the Crock Pot:

We use 4 cups of water to 1 cup of steel cut oats. We usually make 2 cups of oats at a time so that we can have leftovers for the week. (I buy steel cut oats by the pound at Whole Foods at $1.15/lb)

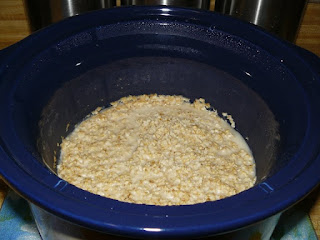
1. Heat 8 cups of water to boiling in our electric kettle, and pour it over the 2 cups of oats mixed with a dash of salt in the crock pot and close the lid.

2. We turn the crock pot on "warm". "Low" is not the same. This is key. It's not really cooking, just staying on warm. If your crock pot doesn't have this setting this method may not work for you.

3. Leave overnight and by morning the water is mostly absorbed. It will be a tad soupy, but we like this because otherwise when we reheat it during the week it will be too thick. We scoop out our portions and microwave it a bit if we want it a little thicker and then refrigerate the rest in individual size portions.
Don't have a crock pot?

Overnight Oatmeal on the Stove Top

1. Toast the two cups of steel cut oats in the bottom of large pot (optional), and mix in a dash of salt.

2. Pour 7-8 cups of boiling water over the oats, OR pour in 7-8 cups of water and bring to a boil.

3. Cover with lid and let sit overnight.

4. In the morning, turn on medium heat and let oatmeal cook until it has reached the desired consistency.

Wednesday, June 16, 2010

Homemade Reusable Sandwich Bags

*Update: After initially writing this post I started making these with water resistant ripstop nylon on the inside. It is more food safe and much lighter for an all together better result! I currently use ripstop nylon to make super compact travel diaper changing pads for sale in my Etsy shop, Seams to Streams.*


When I learned of the existence of reusable sandwich bags, I went googling to see what it was all about. I found this blog with a very user friendly tutorial on how to make reusable snack bags yourself. I saw elsewhere (can't remember where), that someone had made a sandwich wrap, but lined it material from a vinyl table cloth instead of PUL.

We had a vinyl tablecloth I was getting ready to get rid of! I preferred the sandwich bag idea over a wrap, so I combined the two ideas. I also had a couple of big pretty cloth napkins that had been given to me for sewing, so I used those as the outer fabric.

How to Make Reusable Sandwich Bags

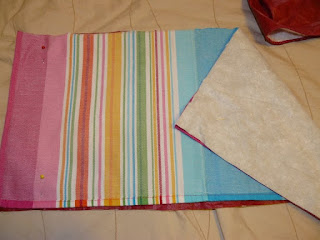
1. First, I cut equal sized rectangles of fabric and tablecloth. I used an actual sandwich bag for sizing, so that folded in half the rectangles were 1 or 2 inches bigger than a sandwich bag:


2. Next, I placed the two rectangles with the pretty sides in and sewed them together at the ends. Just two straight lines! :)


3. Next, I turned the sewn together rectangles so that the fronts were facing out, and put a strip of velcro on the vinyl side, leaving room on the edges for sewing together later. In order to place the velcro accurately without bothering with too much measuring, I went ahead and stuck an equal size piece of velcro right onto the piece I'd already stuck. Than I could fold the material and just unpeel and stick the other side on.


4. I folded the rectangle with the vinyl/velcro side out (inside out), and sewed the two sides together. Just two more straight lines! :)


5. I turned it back, and the job was close to done, but something had to be done about that inner seam if I was going to carry a peanut butter sandwich in this!


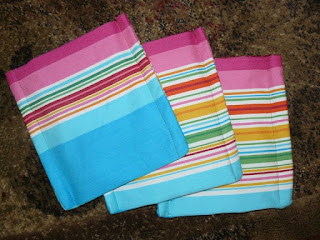
6. So finally I sewed just two more straight lines down the sides with the bag turned right side out to enclose those seams. Here is the final product from the outside:

And from the inside:You can see it is the same size between the seams as a regular sandwich bag:


Just wipe and reuse!I've already tried it. It works great! Of course, you cannot put really hot things in there or heat it.

This has inspired quite a few more "reusable" ideas that I CAN'T WAIT to try! I'll keep you posted. I also found some beautiful "vintagey" fabric at a consignment store that I plan to make more of these with.

Sunday, June 13, 2010

Menu Plan Monday


Don't miss my GIVEAWAY of the
More with Less cookbook starting next Monday June 21st!

This will be a short week for cooking as my husband will be flying out for Haiti Friday evening! My daughter and I will be traveling to be with family. This week I'll be picking up some soybeans and finally trying out a couple of recipes with them.

Monday: Chicken Loaf (More with Less, pg. 184) Still using leftover chicken from the freezer, homemade chicken stock, and homemade bread crumbs. All other ingredients are on hand.

Tuesday:Soybean Loaf (More with Less, pg. 109) Only need soybeans to be ready for this. This will help use up the cottage cheese leftover from last week.

Wednesday:Soybean Casserole (More with Less, pg. 110) Everything on hand except soy beans.

Thursday: Vietnam Rice and Spinach Loaf (More with Less, pg. 130 and 234) I need to refresh our rice, but all other ingredients are on hand.

Friday: Leftovers or peanut butter sandwiches on homemade bread! I'll be taking my husband to the airport!

Saturday & Sunday: Traveling! I hope to try some more recipes from More With Less while with my family out of town.


Resulting grocery list: rice and soybeans.

For more menu plans visit: Organizing Junkie!