Showing posts with label DIY. Show all posts

Monday, September 17, 2012

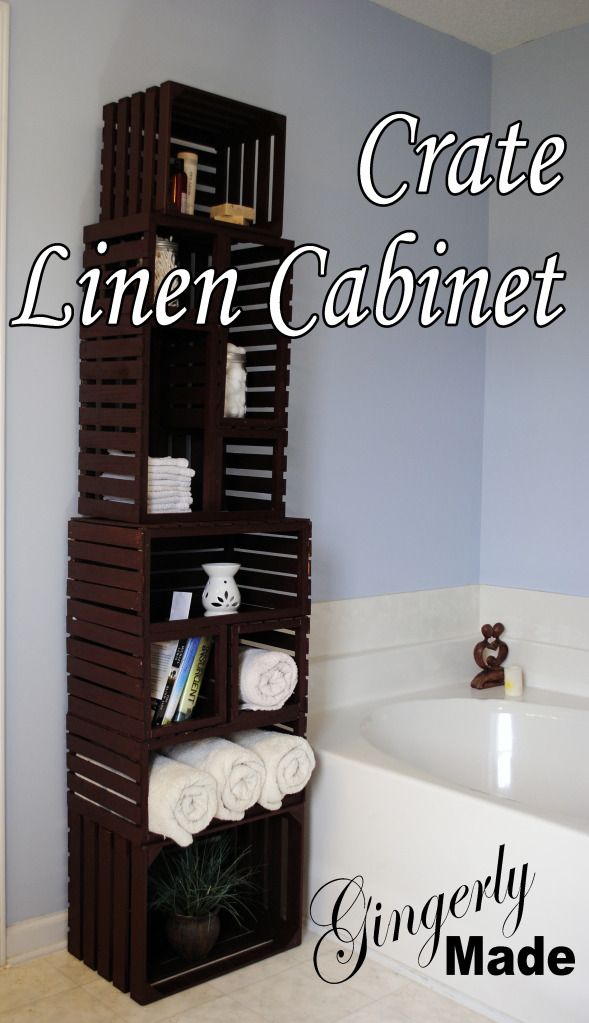
Wood Crate Linen Cabinet

By contributing writer: Ginger re-posted from Gingerly Made

Frugality and simplicity can effect so much of our lives. Today I want to talk about decorating our homes.

As a craft blogger, I spend a lot of time making things, but I don't want to spend a lot of money on supplies. I'm sure you are no stranger to the pallet and wood crate craze everyone seems to be on lately. Well, I'm no exception. I love that you can find pallets or crates for free to cheap and they give a rustic charm to your decorating that I personally love.


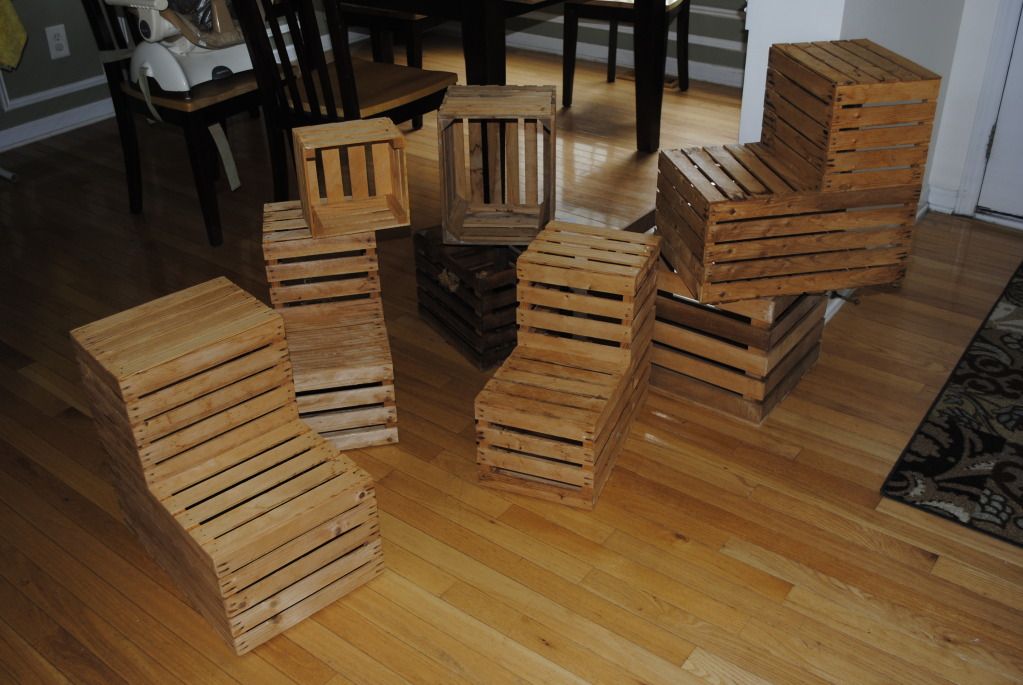
It took me a long time to find some crates. I was actually a wee bit frustrated about it because I had this project specifically in mind. Finally I found some on found some on craigslist! They were not the size or shape I wanted, but I figured since I couldn't find any elsewhere, I'd get them anyway.

Before
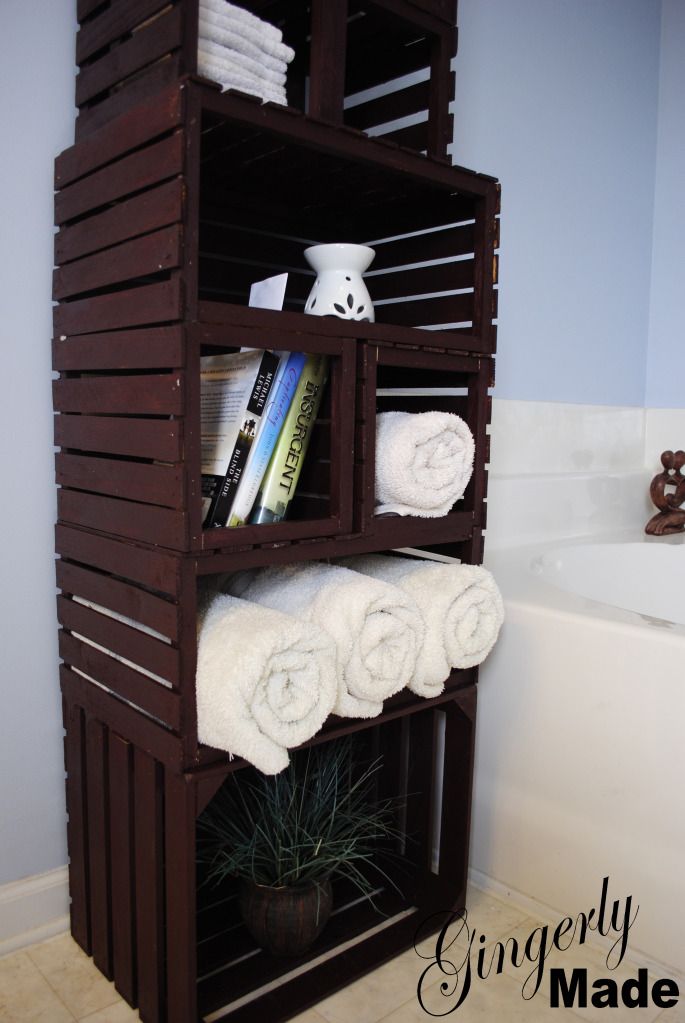
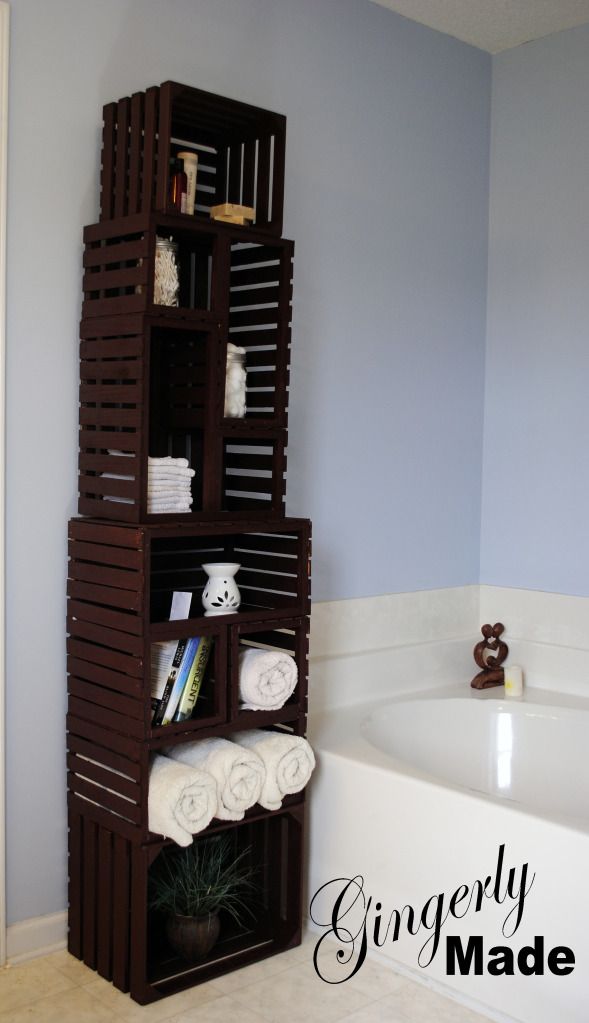
I had to be creative in how to arrange the crates since four of them were this odd L-shape. Which meant that they also needed some restructuring. But we went from these flower display crates to this awesome crate linen cabinet. Or bookshelf. Whatever you want to use it for. I just wanted it for a linen cabinet.

Here's what we did.

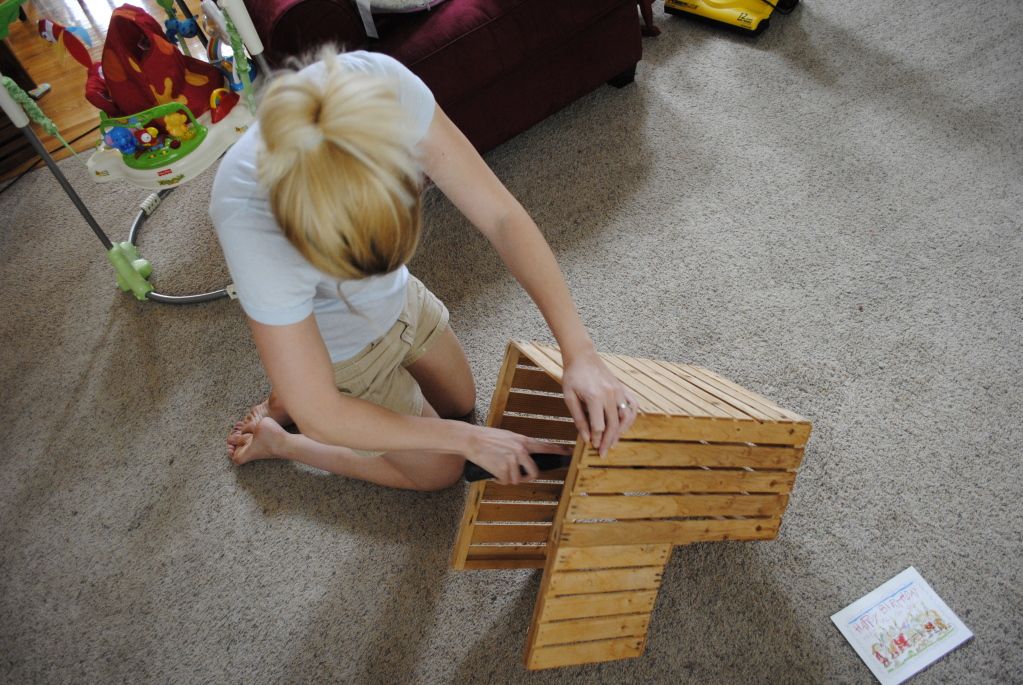
Because of the L-shaped crates we had to remove the slats from one side and reattached them to the other opening up the front of the crate. Basically, we had to move the slats around so the correct side would be open once stacked up.


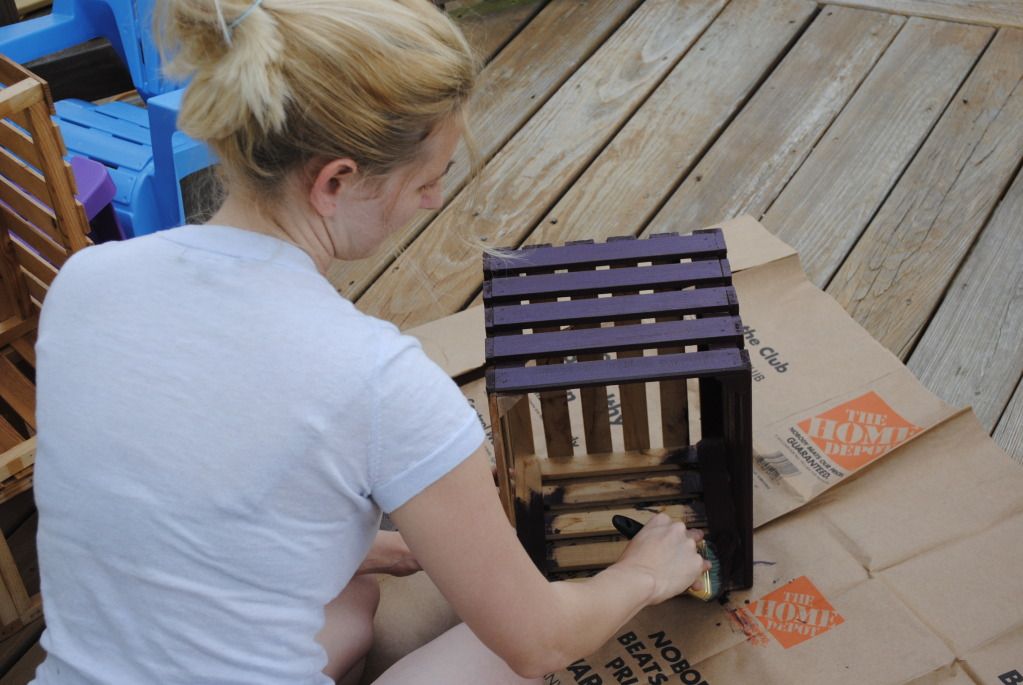
Then we painted the crates, used wood glue and nailed the crates in place as we re-stacked them.
 

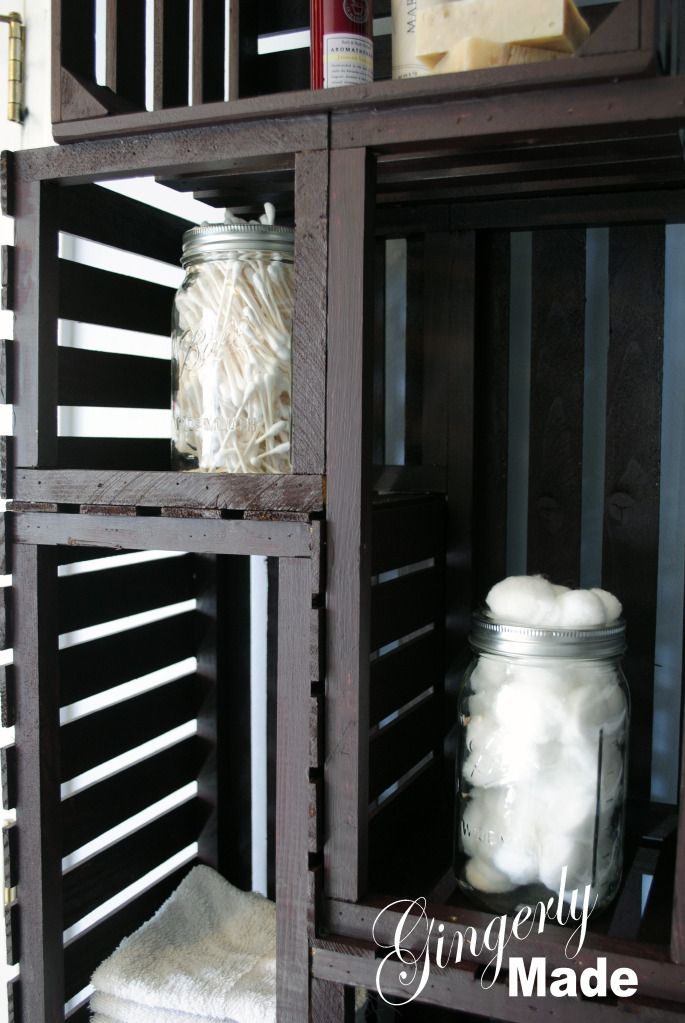
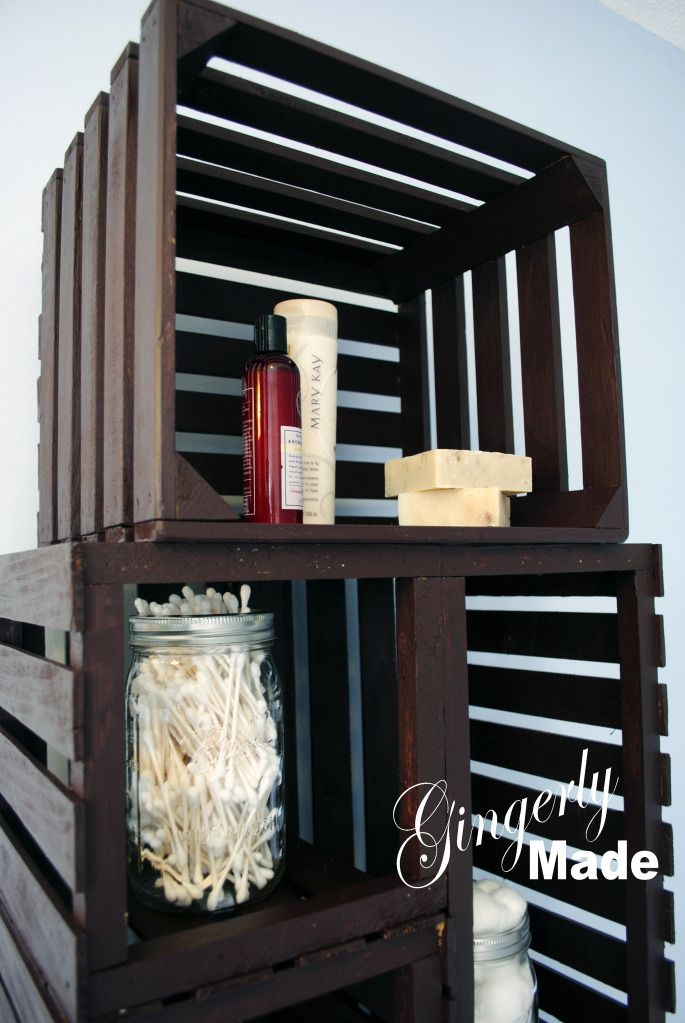
It turned out REALLY good! Then I filled it up with Mason jars for my Q-tips and cotton balls, lotions, and homemade natural soaps, towels, and wash cloths. And most importantly as the linen cabinet is sitting beside the tub, a place to set my book after I'm done taking a bubble bath. Ah, simple bliss.


Wednesday, June 20, 2012

Natural and Frugal Bathroom Cleaning

Contributed by Lorissa of Beautiful Somehow

Clorox Wipes, Windex, Scrubbing Bubbles, Tilex, Pine Sol, Lysol, and Clorox Toilet Bowl cleaner. This is just a small list of all the cleaners we are made to believe we need in order to have a clean and sanitary bathroom. If you don't use every cleaner above then you have a nasty and germ filled bathroom. This is what I believed. I loved using Clorox wipes and Lysol. It killed the germs. Clorox Toilet Bowl cleaner and scrubbing bubbles were toilet necessities! Windex...well that is a no brainer...you get a streak free shine! Mop the floor with Pine Sol and spray the room with febreeze. Squeaky clean and smell good bathroom!

While all of those cleaners do kill germs, they also contain a ton of chemicals. We all know this, yet we still love to use them. I know I did. I just figured all of the talk about chemicals in our cleaners was just a bunch of hype. It doesn't really affect my health that much. Right?

But...did you know that...

The American Lung Association warns that "Some products release dangerous chemicals, including volatile organic compounds (VOCs). Other harmful ingredients include ammonia and bleach. Even natural fragrances such as citrus can react to produce dangerous pollutants indoors. VOCs and other chemicals released when using cleaning supplies contribute to chronic respiratory problems, allergic reactions and headaches ".

The Organic Consumers Association says "Cleaning ingredients vary in the type of health hazard they pose. Some cause acute, or immediate, hazards such as skin or respiratory irritation, watery eyes, or chemical burns, while others are associated with chronic, or long-term, effects such as cancer."


 If you have little ones at home this can be concerning. Think about if one of your little one's get a hold of that bottle of cleaner. That thought alone was enough to make me throw them out. 

Money was another big reason I decided to switch. Buying all of those cleaners, to achieve my sanitary bathroom, was costing a lot! 

Here is what they usually cost...
Clorox Wipes 150 ct. - $7.74
Windex- $2.87
Clorox Toilet Bowl Cleaner- $3.76
Pine Sol- $2.97
Scrubbing Bubbles- $2.47
Tilex- $3.78
Febreeze- $4.97

For a grand total of $28.49! That much to clean a bathroom?! Oh..and don't forget the cost for paper towels to wipe it all down. Even if you do decide to go with the cleaners that are "green" you are going to be paying just as much, if not more!

Okay enough of the why  you should ditch those expensive, chemical laden cleaners. What do you do instead? I still want a clean, sanitary, and pleasant smelling bathroom!


Remember the kitchen and floor cleaner I told you about? Grab that, some baking soda, and either your un-paper towels or even better a mircofiber cloth.

To start out, I usually spray down the whole toilet (inside included) with my lemon vinegar solution and sprinkle baking soda on the inside of the toilet. Let that set while you clean the rest.

I mentioned in my first post on getting started with natural cleaners that I eventually wanted to make my own "Windex". I finally figured out the perfect recipe! It is a little complicated to make and contains a lot of ingredients. Ready....grab your lemon vinegar solution and spray it on your mirror. Wipe with a clean microfiber cloth. That is it. Complicated right. ;-)  It is amazing all the things water and vinegar can do!  (Vinegar Tips.com actually shares 1001 ways to use vinegar!)

I do suggest using a microfiber cloth to clean you mirror. It removes lint and works wonderfully. You can buy a pack of 3 at the Dollar Tree! When you first spray this on your mirror and start wiping, don't panic, it may look like it is starting to streak. Be patient, let it dry all the way, and you will have a clean and streak free mirror!

Then I spray down my sink, counter tops and faucet and wipe clean with the same microfiber cloth. Wipe the toilet clean, scrub the toilet with a brush, spray and wipe down the shower with the water and vinegar solution. Finish with spraying the floor and mopping it clean.

You now have a sparkly cleanfresh smelling, and sanitary bathroom using only two cleaners! Amazing! I love to clean my bathroom this way. It smells wonderful, looks great, and I don't have to worry about harmful chemicals!

What does it cost to clean this way? Literally pennies!


Have you already made the switch to more natural cleaners? Any recipes you love to use in your bathroom?


Monday, June 18, 2012

DIY Chemical-Free Homemade Bug Spray

Contributed by Anna of Not Knowing Where

Our garden has been growing at an incredible rate, thanks to the attentions of my husband, and his right-hand toddler man. Here in North Carolina, the mosquitoes are terrible, especially in the garden in the afternoon/evening. I wanted to make some bug spray for my men to use to rescue them from biting insects, and spiders.

I discovered that making your own bug spray is literally as easy as making a cup of tea. The ingredients are incredibly affordable and have a long shelf life before being mixed together.

I went to my favorite natural health store in town to get the essential oils that are most effective. I've found my local natural health store to be an incredible resource - both for ingredients and for advice. These people really love what they sell, and have much more experience than me. The chain stores (of which we have two) will try to point you to the $20 bottle of all natural, herbal, yada, yada, that they have pre-mixed on their shelf. But this little unimposing store was immediately on board with my DIY desire, and helped me pick out the most effective essential oils.

I decided on citronella ($3.50) and lemongrass ($6.00) for the essential oils. Growing in my garden, I have spearmint and lavender. However if I didn't have these plants I could have puchased them dried at a very low cost.

Here is list of ingredients I used:
  • Water
  • Dried lavender flowers
  • Dried spearmint leaves
  • Citronella essential oil
  • Lemongrass essential oil
  • Rubbing alcohol or Witchhazel
At home, I boiled 8 oz (1 cup) of water. I poured the boiling water over 2 tablespoons each of dried spearmint and lavender. I used a mug just like I was making a cup of tea, and covered the mixture to steep. After it cooled to room temperature, I strained out the herbs. To my herbal "tea", I added 14 drops of citronella and 7 drops of lemongrass.

Finally, I poured the whole thing into a spray bottle. For ease of evaporation, I decided to add some rubbing alcohol. Witchhazel is another (but more expensive) option if you want the spray to more quickly evaporate on the skin. I added enough rubbing alcohol to produce 10 oz total of bug spray. This is a minimal amount. Some people double the amount of liquid by adding much more alcohol or witchhazel.

It cost me less than $10, and will make enough bug spray to last many, many, months of summers. No harsh chemicals, inexpensive, and effective!

Wednesday, May 30, 2012

Because It's Fun, Adventures in Mixing Makeup


Contributed by Anna of Not Knowing Where


Did you know that you can create your own makeup from items that you probably have in your kitchen right now? Recently, Wellness Mama wrote a post about just that. I spent the following weekend scattering a multitudinous amount of colored powders across my kitchen and bathroom, in an attempt to concoct my own blends. I tried most of her suggestions. I made several happy discoveries, and experienced a few disappointing revelations. It was a little trickier than Wellness Mama's simple post made it appear.

"Why in the world," you may ask, "are you mixing your own makeup?"

Three reasons. One - My skin has developed allergies to just about every product that is found at a drug store. Two - I've always disliked the fragrances of cosmetics. Three - Mixing makeup just seemed like a lot of fun. What can I say, I do strange things on Friday nights after the toddler is in bed.

Inspired by an expert, here are my stumblings in creating makeup in my kitchen...
Foundation Powder, Eye Shadow, and Blush
 Here is the initial color pallette of my endeavor:
  • White: corn starch
  • Brown: cocoa powder
  • Orange: cinnamon
  • Red: dried hybiscus
  • Black: activated charcoal
In addition to lightening up the makeup, the corn starch is integral to absorbing the colors and spreading them on your skin. My skin also happens to thrive on the corn starch. Go figure. Whereas makeup I've bought has always made me break out, this stuff actually keeps breakouts at bay. Crazy!

For the foundation powder, I mixed cocoa powder and cinnamon into the corn starch until I was happy with the color. The corn starch and cocoa powder both tend to clump. A tea infuser worked as a sieve to break apart the clumps and help it mix. 
I used the skin on my arm as a guide as I alternately mixed cinnamon and cocoa powder into the corn starch for the best shade. 
For the eye shadow, I started by emptying one capsule of activated charcoal into a small bowl. To the black, I added cocoa powder and cinnamon alternately until I found a brown I was happy with. 
The activated charcoal plays a similar role as the corn starch. It is a smooth base that helps the makeup stick to the skin.

The blush works a little bit differently than the foundation and eye shadow. The red from the hibiscus requires a small amount of moisture to get absorbed into the corn starch. I ground the hibiscus into as fine a powder as I could get. A coffee grinder is perfect for this. I sifted the hibiscus through the tea infuser into a small bowl. It was about 1 tablespoon. Then I added an equal amount of corn starch to the red powder. Next, I added a very small amount of water. No more than 1/4 teaspoon. I mixed well with a spoon, then I started using my fingers to work the hibiscus and corn starch together. 
The result was a bright pink powder. Continuing to use my fingers, I added cocoa powder, more corn starch, more hibiscus... until I was pleased with the shade.

The most expensive part was the activated charcoal. It cost $9 at a health food store. However considering I have enough to make a lifetime of eye shadow, I figure it was $9 well spent. Hibiscus was $2 for an ounce at my local health food store. An ounce of dried flower petals is more volume than you would think. It may make ten batches of blush.

Making makeup in your kitchen is super cheap, and a lot of fun for the artistically minded. Have fun!

Monday, May 28, 2012

Homemade Taco Seasoning {Chicken Taco Soup Recipe}

My friend Rachel passed a recipe on to me for "Chicken Taco Soup" that is delicious and super easy to throw together in the crock pot or prepare in bulk and store in the freezer for multiple crock pot meals.

One of the ingredients on the original recipe is "one packet of taco seasoning," and scribbled out beside is a homemade alternative that I was pleased to find is comprised of ingredients that we keep in our spice cabinet! I love scratching pre-made ingredients off my shopping list! Use this in any recipe calling for a packet of taco seasoning:


Equivalent of One Packet of Taco Seasoning:

1 Tbsp. chili powder
1/4 tsp. garlic powder
1/4 tsp. onion powder
1/4 tsp. crushed red pepper flakes*
1/4 tsp. dried oregano
1/2 tsp. ground cumin
1 tsp. salt
1 tsp. black pepper


*This is a bit spicy, so if you prefer a milder seasoning, leave out the red pepper flakes.

The possibilities of course are endless with this. It makes delicious "taco meat," and I've even made taco flavored hummus!


Now for the yummy soup recipe:


Chicken Taco Soup:

1 chopped onion
1 each 16 oz. canned chili beans*,
black beans, and corn. (I use frozen corn)
1 8 oz can tomato sauce
1 cup of chicken stock or broth
2 10 oz cans of diced tomatoes
1 Packet of Taco Seasoning (or above recipe)
2-3 chicken breasts

For topping:
Sour cream (We use plain yogurt and it tastes great!)
Shredded cheddar cheese
Tortilla Chips (or Fritos )


*I stopped using kidney beans and started preparing my own black beans via Trina Holden's instructions in Real {Fast} Food to eliminate canned beans!

Just dump everything in the crock pot and make sure the chicken is below the surface of the liquid ingredients. Cook 5 hours on high or until chicken is cooked through. Pull out chicken and shred, and return to soup. That's it!

{Confession: We eat this with Fritos, which I was pleasantly surprised to discover has a refreshingly short ingredient list of only three things! You should check it out. I'm not going as far as to call it a "health food" though! ;) }

To Prepare in Bulk:

 I quadruple the recipe in a large pot on the stove top using the same amount of chicken as the original recipe for more with less. I divide into as many quart size freezer bags as possible and freeze.Then a few hours before serving, I just dump a frozen quart bag of it in the crock pot and put it on high.


***************
Thanks for stopping by! I invite you to:

Stop by my Etsy shop, Seams to Streams here.
Follow me on Twitter here.
Join me on Facebook here or here!


***************

Linking up with Raising Homemakers, Growing Home Blog, and This Chick Cooks

Monday, May 14, 2012

The Cheapest Chalkboard Labels and More!

I mentioned before that the possibilities of chalkboard contact paper are limitless. That being so, I had a bit more fun with the roll I bought.

First of all, I had not too long ago ordered chalkboard labels for my kitchen canisters. I think they look very cool and are so practical in that they allow you to change the contents of any given canister without peeling off a sticky label.

I bought the cheapest labels I could find on Etsy, but they were still fairly expensive for what they are. I love them except for the fact that they are so small you cannot fit two words on them, like "white flour," "wheat flour," "brown sugar," "white sugar," etc.


 This chalkboard contact paper gave me a MUCH cheaper solution, tailored more to my purpose. I had one canister not yet labeled, so I made a label for it, and will eventually replace the smaller ones on my other canisters as well. (You can see the sheet of smaller ones I bought on the left edge of the picture for size comparison.)

*****************************


Another simple and fun use of this chalkboard contact paper is to re-purpose any picture frame to make a decorative framed chalkboard for verses, quotes, lists, or whatever you want! I just simply covered the glass with the contact paper! Smaller versions of this would make great economical yet thoughtful Christmas presents. ;)


******************************

And finally, I was able to make bigger chalkboards for my children's Bible memory verses by simply plastering a large chunk of chalkboard contact paper on the wall! I just traced a large frame I had for the basic shape and then cut dips out of the corners and done!


Yay for really cheap, easy, yet beautiful things!!!!!!!


Linking with: Growing Home and  Raising Homemakers, and Frugal Friday @Life as Mom.

Tip Junkie handmade projects

Monday, May 7, 2012

Space Saving DIY Toy Stove and Art Easel {Chalkboard Contact Paper}


We have a small home, and I am more than content with that. However, my two and a half year old daughter is getting to an age where a toy kitchen would be an ideal toy for her, but there simply is not room.

My daughter "Peanut", being the creative and imaginative girl that she is, found a solution for that!

We have a small bed side stand type cabinet in her room that I once used for her books (which are now on a book shelf). One day Peanut started opening the door and putting her toy cupcakes in the cabinet to "bake" them, pretending that it was a stove.

I looked at the little cabinet and thought, "I can paint four burners on top and paint the front black so that it looks like the window into a stove!"

Since I have very little experience painting, and very little time right now, I thought it would be a long time before I would get around to such a project.

That was until I discovered Chalkboard Contact Paper.  The little stove is the first thing that came to mind. How easy it would be to just cut out four little circles and stick them on, as well as the front "window" of the stove?

I ordered a roll of the contact paper for less than eight dollars, and as soon as possible after the contact paper arrived, I did just that. It took about 15 minutes, and that because I was doing other things at the same time.

I also ordered a little cooking set, and now my daughter has a little stove to cook on without adding a mite of furniture to our home!


Another toy that I have thought would be ideal for my daughter if there were sufficient space is a toddler art easel. We have a little toddler table for tea parties and artwork, so for both reasons of space and the fact that we really don't need another place for her to draw and color, I had let the idea go completely.


But alas, we have an exposed side to our large old refrigerator in the kitchen and it occurred to me that I could made it into a little chalkboard! Since it's magnetic, we can also use magnets to secure paper there for her to write, color, or paint on too. There you go! The primary functions of an art easel only without a tray for supplies. I am thinking of ways to attach something to hold chalk and markers to the fridge, but for now I prefer to not have them laying about freely anyway.


 The possibilities of this amazing contact paper are endless! I have a few other things I can't wait to do with it!

Super cheap. Super easy. Super fun!

*******************

Tip Junkie handmade projects

Friday, February 25, 2011

Homemade Yogurt in the Crock Pot!

Boy, have I learned a lot in the past 48 hours or so! First of all, I've been back and forth about whether to bother making my own yogurt or not because all the recipes that I could find that were supposed to be "easy" did not look so "easy" to me! Why? Because checking the temperature and keeping it just right for hours is something that this "global" mom would never be able to stay on top of. Yes, I always have multiple things going on at once but that level of attention to detail is beyond my ability and makes me nervous! I would have to stand there the whole time. I would never remember to check otherwise. I know that you can get a system down with trial and error and find a way to incubate yogurt without having to check, but I was dreading the trial and error and all the potential waste of milk and time in the process. I even have my mom's old yogurt maker that works really well, but we go through it SO FAST that I would have to make it so often since that makes a pretty small batch compared to what we use.

I saw a recipe once for making yogurt in the crock pot, but so many of the comments were negative, saying that it had come out runny, that it discouraged me. I lost my motivation.

Until this week. The fact that we go through yogurt so fast had gotten me thinking about really doing this some way in which I can make bigger batches.

Then I discovered, "A Year of Slow Cooking." I know, I know, I'm way behind the times, but I'm SO excited! That blog will become one of the three cookbooks I'll be using for a year starting in April. (I'll share the other two in a later post.) Stephanie's enthusiasm and results along with the many positive results shared in the comments motivated to try this, and as she would say, "It works! It really really works!"

My daughter and I enjoyed the tastiest most perfectly textured yogurt today that I have had in a long long time...if ever!!!!!!!!! THANK YOU STEPHANIE! My fingers aren't quite shaking, but I'm very very excited, which is why I'm writing this post right now when I should be doing a lot of other things!

I won't repeat all of Stephanie's recipe, you can just check it out here. I will describe how I "sorta kinda" adapted it.

1. I heated a half gallon of whole milk on low fro 2.5 hours as the recipe called for.

2. The next step was to unplug it and let it sit for three hours. I didn't exactly follow this because I have the thermometer that goes with my mom's old yogurt machine that is perfect for global folks like me and doesn't even have numbers! It just has an arrow signaling, "When the temperature is here, mix in the starter!"  Love it!

Therefore, I took off the lid and let it sit a while and checked a couple of times...not sure how much time went by, I think it was about an hour, but the temperature was just right the second time, so I scooped out two cups of it into a separate bowl and mixed in a half cup of store bought yogurt.

3. Then, since I knew it was at the perfect temperature, I put the lid on the pot and wrapped that sucker in TWO HUGE towels as airtight as I possibly could, because I knew it needed to not get any cooler.

4. Then I just forgot about it. The this morning, around 7:30, I remembered. I hadn't been in the kitchen yet because my dear husband brings me a mug of coffee as I stagger to a chair in the living room in the mornings where I remain with my coffee until Lydia wakes up and/or I remember that yogurt is incubating on the counter! For this reason, it was incubating for about 12 hours. I'd meant to leave it for only 10.

When I opened it up I saw clumpy yogurt with liquid separating it a little. I was excited because I knew this meant "not soupy." Yay! This was after stirring a tad:
 

This is where I reveal what a rookie I am, but it wasn't until yesterday that I learned that you call that "liquid" whey. I had tried to print out Stephanie's post, forgetting there were 400+ comments, and needless to say, it ran out of paper before even finishing the comments. I did scan the comments and that is where I learned what whey was and that you could use it for other things, like baking bread.

I did a quick search on uses of whey and got some great information really quickly. I knew I wanted to get some of that whey out for a bit thicker consistency of yogurt, so first I tried using our coffee sieve and scooping out a bit at a time and letting the whey drip off. I quickly learned that this was not going to work.


I thought I needed cheese cloth but I tried using one of our buffet style cloth napkins that we use as kitchen cloth because it is thin. I wet it, wrung it out, and laid it in a colander which I sat on a bowl. I emptied the crock pot of yogurt into the colander and sat it in the fridge for an hour or two. I know that's a broad range, but that's just how I work.


I was so excited when I pulled it out. The yogurt was just right, and I had about 2 cups of whey. Exactly the amount that I needed to substitute whey for water in my easy homemade bread recipe (which I'll be posting some tips on soon).  I learned from my earlier search that using it instead of water to prep the yeast would make the bread moister and add some protein. I'm excited about all of the potential uses of whey, a great list of which you can find in this discussion on Chow Hound. It led me on a search about how to make mozzarella cheese, which I might just try after our trip to Brazil!


So finally I had a big bowl of yogurt in the fridge and a nice bit of whey on top waiting for the bread baking, which happened to be today since we just ran out.


I was distracted and left out a couple of important steps in the bread making and we were short on yeast. It's cooling now, but I don't expect the results to be stellar. I will try again and let you know how it turns out!

All in all, I can see this EASILY becoming a weekly routine! Set milk in the crock pot  on low for a couple of hours around dinner time. Take the lid off and let it cool, keep check, but it should be ready in an hour or so to mix in a tad of last weeks yogurt. Then wrap it up in two towels and forget about it until the next morning. Save the whey and make bread for the week as well. LOVE IT!!!!!!!!!!!!!!!!!!!!!!!!!!!!!

Scratch yogurt off my grocery list! Woo Hoo!!!!

Wednesday, January 26, 2011

Very Easy {Two Ingredient} Homemade Liquid Handsoap

A while back I wrote about how using bar soap over body wash for bathing helps avoid waste, saves money, and saves unnecessary packaging. I guess this is again where the "choosy" wins out over the cheap, because when it comes to hand soap, I prefer liquid. I don't like the  grunge that inevitably builds up on the soap (or so it always seemed at my grandparents' house growing up).

I read on a forum somewhere a few months back that you could make your own liquid hand soap by grating up a bar of soap and boiling it in 6 cups of water. I finally got around to trying it last week. I was concerned when I "Googled" it because I almost always saw glycerin as an essential ingredient in most recipes. If you follow my blog you know I like things uber simple with as few and as "common" ingredients as possible. Glycerin is very cheap and would last a long time though so I'm not knocking it. However, since I didn't have it around, I asked a fellow blogger if it was necessary and discovered that if you use regular bar soap, rather than castille soap, the glycerin is not needed because it already has it.

It worked REALLY well, and was simple enough to make it worth doing again. I was treating it as an experiment, and doubtful that I would do it regularly because of time constraints, but I definitely will continue because it's very easy to do while cooking dinner or any time for that matter. Here's how:

1. Grate bar of soap. (I used Ivory because that's what we typically have around.)


2. Bring 6 cups of water to a boil and add bar soap. Stir until soap is dissolved.


3. Turn off heat and let cool for 15-30 minutes or long enough to be cool enough to put in soap dispensers.


4. Put in dispensers and let sit until it thickens up. With Ivory it turned a whitish color.


Scratch liquid handsoap off my shopping list! Yay!

*Added Note, 2/18/2011
When I went to make another batch of this I realized that a good bit of soap was still clumped together in the dispensers. I just added a bit of warm water to each one and shook them up and they started shooting out soap again, a bit more liquid, but plenty of soap to do the job!


Tip Junkie handmade projects

Friday, January 14, 2011

Homemade Ranch Dressing: Good News for the Tastebuds, Not so Good for the Waistline

Do you love Ranch dressing, but would like to know what's IN your Ranch? You can make your own just about as quickly as you can whip up a batch out of a pre-prepared packet!

Some time back, I posted about my deliverance from my Ranch dressing addiction brought about by an equally yummy homemade olive oil and garlic salad dressing. That was all well and good until recently.

We had baked chicken the other day, which made me really crave some Ranch because I LOVE it for dipping baked chicken in. I decided to look on line and see if there was a recipe for homemade Ranch. I was doubtful, but my husband told me that there was. He follows Hallee Homemaker's blog and had seen it there.

I went and found it and within 10 or 15 minutes, had a cup of the most delicious Ranch Dressing I'd ever tasted! That's how quick and easy it is, and yes that means you don't need fancy ingredients because obviously we already had everything needed!


I couldn't believe it was that simple. Now I'm really happy because if God ever calls us to another country, I can make Ranch Dressing! I've already shared it with one friend living overseas and plan to share it with more. That is so exciting to me. Yay!

 Here's the recipe:

⅓ cup mayonnaise
⅓ cup plain yogurt (or sour cream)
⅓ cup buttermilk (I just use whole milk because that is what we keep around)
¼ tsp salt
¼ tsp fresh ground black pepper
¼ tsp garlic powder
¼ tsp onion powder
½ tsp dried parsley flakes
½ tsp dried dill

Stir it together and store in whatever you please. Chill and serve on whatever you fancy. :)

Yum!

Tuesday, January 4, 2011

Homemade Macaroni and Cheese on the Stovetop


 *Disclaimer: I realize this is nothing new to the rest of the world, but please humor me. I began this blog originally by logging my experiences in learning to make things myself that I was used to buying pre-made. It's a little challenge I've been enjoying. Please don't think badly of my mother. I wasn't the least interested in these things as a kid and didn't pay attention. It's not her fault! :)
 
 I spend time with my friend Rachel on Thursdays, and the last time I was there, she made some mac' n cheese with...you won't believe it...CHEESE! I was pretty excited because I hadn't seen it done that way, that I *remember.*

Yet again, I was surprised to learn how to make something simple from scratch that I'd only ever known to come out of a box. I must say, my mom did make homemade macaroni and cheese when I was a kid, but it was in the form of a casserole, and I never thought of it as an option for a quick, stove top meal.


I haven't got measurements because she just eye balled it, and so did I. It's pretty hard to go wrong.

1. Start about 2 cups? of macaroni noodles boiling.
2. In a saucepan, melt 2 or 3 tablespoons of butter.
3. Add about 2 cups of shredded cheddar cheese.
4. Stir in "a little" milk (sorry for the vagueness.)
5. Continue cooking and stirring on medium low heat until blended.


6. When I realized I was just making a white sauce with cheese, I added a tablespoon of flour to thicken it a little.

7. When noodles are done, strain them and then mix them into the sauce.


This is where the "choosy" wins out over the "cheap," because cheese is expensive. That's why I'll just make this every once in a while. I'm not at all opposed to a good ol' box of Kraft Mac n' Cheese every now and then either. I'm just glad to know I can do it myself. This way a comfort food becomes a healthy food...relatively speaking.;)

Scratch boxed Mac n' Cheese off my grocery list!

Monday, August 16, 2010

Vintage Zoo Reusable Sandwich Bags-Put to the test

I've been quiet for a while about sewing projects as preparing for my cloth diaper events this fall has taken up most of my free time.

However, I have been putting my reusable sandwich bags to the test! A while back, I made more of these bags out of this adorable vintage zoo toile fabric. They are lined with PEEVA tablecloth material and have an aplix closure. I have been using these bags both for carrying Lydia's baby food, bib, spoon, and napkin in her diaper bag. I've also been using one of the original bags for Lydia's Bummas wipes and solution. This sandwich size bag is perfect for sandwiches, but as you see it can be used other ways as well. Below you can see it flat with the baby food and accessories sitting beside it for size reference.


Here you can see it stuffed with the baby food, bib, and spoon.


After at least 2 months of use, I've found it to do the job very efficiently. It's easy to wipe out and since we're phasing out of paper towels, I've found the paper towel holder great for hanging the sandwich bags on to air out!


If the outer fabric gets soiled, you can hand wash it and let it hang dry. I'm using Charlie's Soap All Purpose Cleaner for my hand washing!

There are many more of these in the works! I just love this fabric, don't you?