Showing posts with label green living. Show all posts

Tuesday, May 1, 2012

Fresh Herbs for the Thoughtless Gardener


Contributed by Anna of Not Knowing Where

Have you ever noticed that many "healthy" recipes look just like your grandmother's recipe, except they call for things like fat-free cheese or egg substitute? When people tell me eating healthy is too expensive, I wonder if it's because they're reading recipes that call for specialty versions of high calorie food - like fat free butter or sugar-free honey.

When I was in college, my grandmother gave me a cookbook that has been a mainstay on my shelf for 15 years. It's a health food book with virtually no substitutes, just good healthy food plus herbs and spicesIt taught me that the secret to great cooking is not more butter or mayonnaise, but more guiltless, honest flavor. 

Eight years ago, I started an herb garden outside my front door. Over the course of a few years, I planted just about everything I liked to cook with, just to see what happened. Freshly picked herbs are incredible!

But here's the thing - I'm a horrible gardener. Maybe half my sprouts survived a season. Very few took hold in the long run. So anything that survived did so despite me, and certainly not because of me. In a strange way, that makes me feel uniquely qualified to make herb garden suggestions. I am here to tell you what herbs to grow that are insanely delicious, and yet have great resilience to the thoughtless gardener.

The ones that make the cut here survived multiple years under my care (or lack thereof). I asked my husband, the gifted gardener, to proof this post and make suggestions. In addition to some careful corrections, he made multiple suggestions of herbs to add. To which I mostly responded, "Nope, I killed that... Can't do that one; I killed it twice... etc." This is not a comprehensive list of herbs that gifted gardeners consider to be easy, but only the humble opinion of one who struggles. Sometimes I feel like too many bloggers only talk about what they are insanely good at. However I'm silly enough to post about my weaknesses, on this, my first contribution to The Cheap and Choosy. Am I crazy? Probably. But here goes!

Mediterranean spices: Rosemary and Culinary Sage
The Mediterranean climate has a rainy season and a dry season. In other words, you can be like me and totally forget to water your sage, then follow this neglect with a period of avidly watering it every day, and then go back to forgetting about it completely. Rosemary, once established, almost never needs to be watered if you live somewhere that experiences periodic rain. The culinary sage gets periodically stressed, but so far has always bounced back. The sage's only problem is bugs. Our rosemary (that I planted!) is large enough to take over the world. Rosemary and sage are both perennials in many zones.

Italian Spices: Oregano and Basil
Oregano will die off to a pile of twigs in the winter, but then generate new growth the next spring. Be warned, there are many varieties of oregano, and they don't all taste awesome. Make sure you know what you're getting, because you will have it forever. Basil is not a perennial in most zones, however it is prolific while it grows. I once decided to hack off the entire plant at its base in June because I was going to travel, and there was no one to water it. When I returned from my trip, it had started growing back. This trick seems to only work in the early summer. If you wait too long, then it will take the hint and die. 

Garlic
I find garlic to be particularly miraculous. In October, go to the store and buy a few bulbs of garlic from the produce section. Divide it into cloves, and bury each one outside. Water it periodically until the weather starts to freeze. Then do nothing until the following spring. If you like spring garlic, then you can pull some up early to eat. In this case, you eat the entire spring garlic plant. If you want full, mature bulbs, then you wait through the summer until the stalk is almost completely dead. Dig up the bulbs, and you have a year's supply of garlic. Store them in a dry place.

Now is a great time to start planting herbs in your yard! Transplants are often best, as many herbs propagate better from cuttings than from seed. Potted herbs can be tempting because there is less weeding involved. However my experience has been that there is no substitute for the plant being in fertile ground. Potted plants dry out faster and do not over winter well for the thoughtless garden. 

The gardening husband insists that there are many more easy-to-grow herbs. Please share your experience if you have a favorite, hearty herb or spice in your yard. The Cheap and Choosy would love to hear your story. 

Tuesday, January 4, 2011

Eco-Felt Owl from Pixiekids Toys and Gifts - GIVEAWAY!***CLOSED***


 Pixiekids Toys and Gifts on Etsy specializes in handmade toys made of eco-felt, which is felt that is manufactured from recycled plastic bottles. How cool is that??? I'm sorry, I just had to let the professional writing style go for a minute there to express just how very excited I am about this shop! Is the picture of the tea set pictured above not enough? I don't know about you, but I'm sold. I just love the details like the swirls on the tea. Absolutely genius.

I was particularly excited to hear from Melisa, because I had just discovered the concept of making pretend food out of felt, and had *attempted* to make Lydia some cookies for Christmas, but barely got started, and they do not even ever so slightly begin to hold a candle to the cuteness and coolness that are the toys available at Pixiekids Toys. Let me just give you a sampling of some of my favorites. It will be hard because they are all very cool! I just love the sushi and cinnamon rolls with icing. They look almost real!


Couldn't you just EAT them?

Not only does Pixiekids Toys and Gifts make play food and groceries, but she also makes adorable eco-felt stuffed animals, games, and more! I especially love the eco-felt owls!

GIVEAWAY!


Pixiekids Toys and Gifts is offering my readers a chance to win their very own eco-felt owl!


Here's how to enter:


Go to Pixiekids Toys and Gifts on Etsy and come back here and leave a comment letting me know which eco-felt toy you'd most like to have!
 
(Leave a separate comment for each entry. Include your email address if it is not easily accessible through your blogger profile.You do not have to have a blogger profile to enter, as long as you leave a valid e-mail address.)

Additional Entries:

Like Pixiekids Toys on Facebook.

Purchase a product from Pixikids Toys.

Blog about this giveaway.

Tweet about this giveaway using @Cheapnchoosy, and #giveaway. (up to 3 times daily)

Like The Cheap and Choosy on Facebook!

Follow The Cheap and Choosy via Google Friend Connect.

Follow me on Twitter.

Grab my blog button and leave a link to where I can find it in your comment.

Subscribe to The Cheap and Choosy via email.

Comment on one of my non-giveaway posts. (One entry per post commented on.)
This giveaway is open worldwide through Feb. 5, 2011 at *11:59 p.m. EST. The winner will be chosen using a random number generator. I will email and post the winner, who will have 48 hours to respond. If winner does not respond within 48 hours, another winner will be chosen.


*Note the change in my usual ending time of the giveaway. I will not be at the computer at midnight, but any entries after 11:59 PM EST will not be included in the drawing.  

This is not a paid post. The opinions expressed are completely my own! You can see my full disclosure here.

Friday, December 10, 2010

Swiff and Fluff on the Cheap!

 As we have all hard floors I had become quite a fan of the Swiffer Sweeper. I also used the Swiffer cloths for dusting. We went through them very quickly until some time ago I saw an article on the Diaper Pin about using microfiber cloths (typically sold the auto section of most department stores) in the place of disposable Swiffer sweeping cloths.

This is my most recent microfiber towel that I haven't cut yet.
While at a discount store I picked up a super cheap microfiber cloth and tried it out. It was amazing, doing exactly what the Swiffer cloth did only...it was reusable! I just shake off the excess dust over the trash can and then toss the cloth in with the dirty towels.


The microfiber cloth was a little large for my purposes so I cut it in half and did not sew the cut side to see if it would fray and after washing it for months, it has not frayed at all!

Later, I received a Nykibaby One Size pocket diaper for review from Monkey Toe Diapers that came with a microfiber towel as an insert. I discovered that it was a very absorbent and trim insert. I didn't even realize how cheap the towels were at the time, but was seriously hoping to find more to use as inserts!

I didn't have to wait long! On a recent trip to Dollar Tree and discovered that they have microfiber towels for a dollar each!


I snatched up a few white ones for dusting and sweeping and a few pastel ones for stuffing and fluffing my pocket diapers. They work SO well and are so cheap. PERFECT for adding serious extra absorbency to an overnight diaper!

And yes I did match them on purpose...pitiful I know! I also have a purple diaper and a purple cloth but it was dirty! :)


Thank you Dollar Tree!!!!!!!!!!!!!!!!!!!!!!!!!

Friday, October 15, 2010

"Guest" Post by Tom.Com: Military Showers

Just so you know, Tom is my dear husband, affectionately dubbed "Tom.Com"for his uncanny amount of knowledge about random things (I go to him before google!),  who has graciously agreed to contribute to The Cheap and Choosy with some great tips for Frugal Fridays! Without further ado...

Earlier this year, I went to Haiti with a group from our church to do some construction. The compound in which we stayed had showers that were fed from a cistern on top of another building. The cistern was expensive to fill, so we had to ration water. Thankfully, I had heard about the so-called "military" shower, but I had not done one until the week in Haiti. As the week went on, my anticipation for a long hot shower grew. And when I got home, I went to take a shower almost immediately. I turned on the water and started lathering up, but there was a check in my spirit. The water that was going down the drain was doing nothing except providing a small measure of comfort. I couldn't, in good conscience, continue wasting it, and I turned it off and finished the shower. I have continued the military shower since then, though, I must quickly admit that I have not always been quick to shut off the water after I finish rinsing.

If you have not already heard of the "military" shower, here it is:
1) Run the water long enough to get wet then shut it off.
2) Lather up with shampoo and soap.
3) Run the water long enough to rinse off.

It's a pretty simple process. It will help save on the water bill. It will help save on the gas/electric bill (depending on your hot water heater type). It has helped to continually remind me of the blessings afforded to us in this country that others don't readily have.

Tuesday, August 31, 2010

Not So Wordless Wednesday: Amazing Wool


The effectiveness and natural wonder of wool is astounding to me. I just had to share this cuteness. It's so fun!!!! I couldn't wait until October!!! More to come about this work of art and it's maker during the Wool Gathering Event, Oct. 11-30! Don't miss it!

Thursday, August 26, 2010

A Picture Worth a Thousand Words {Frugal Friday}


We finally got our clothesline up! I already have a hard time getting everything done that I plan to, so we're not going to be "all or nothing" about this! As much as possible, I'm going to hang clothes out on the line, especially things that take the longest to dry, like towels. We'll see how it goes. Every little bit counts right? Right now I'm also looking at it as something to get me out of the house when I'm tempted to stay inside and "get things done!" And when we don't have time to hang...wool dryer balls to the rescue!! Stay tuned for a review and giveaway of some wool dryer balls during The Wool Gathering Event...oh and you fluff addicts...look close, some of that fluffy goodness are things that I'm reviewing for giveaways as well....stay tuned!

Thursday, July 29, 2010

Toiletry Tips Part Three: Adios Facial Scrub!

A couple of week ago I shared about no longer using shampoo, but washing my hair with baking soda and vinegar instead.


Well, we ran out of Aveeno face scrub around that time, and I've been debating about whether to replace it or not ever since. I was really questioning the necessity of special face cleaners. Then one day this week as I was washing my hair with baking soda, I remembered I thought about its abrasive quality. I already use it for scrubbing the sink, pots and pans, and even the bathtub.

I thought I'd try it on my face, not rubbing too hard or too long of course. The results were great! My skin felt so smooth and fresh. I looked it up to find it's a common practice. I did see a couple of people saying it burned if you have an open sore, but I think that would be true for just about anything!

I'm not sure it's best to use any kind of scrub on your face everyday, even though I do it, and I'm sure you should rub very gently, but I can find nothing, on line at least, that gives reason not to do it! This will save money and unnecessary packaging waste!


Scratch face scrub off my list! It's getting shorter by the week!


Find more frugal tips at Life as Mom's Frugal Friday!

Wednesday, June 16, 2010

Homemade Reusable Sandwich Bags

*Update: After initially writing this post I started making these with water resistant ripstop nylon on the inside. It is more food safe and much lighter for an all together better result! I currently use ripstop nylon to make super compact travel diaper changing pads for sale in my Etsy shop, Seams to Streams.*


When I learned of the existence of reusable sandwich bags, I went googling to see what it was all about. I found this blog with a very user friendly tutorial on how to make reusable snack bags yourself. I saw elsewhere (can't remember where), that someone had made a sandwich wrap, but lined it material from a vinyl table cloth instead of PUL.

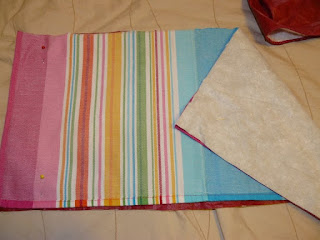
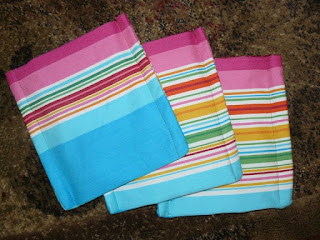
We had a vinyl tablecloth I was getting ready to get rid of! I preferred the sandwich bag idea over a wrap, so I combined the two ideas. I also had a couple of big pretty cloth napkins that had been given to me for sewing, so I used those as the outer fabric.

How to Make Reusable Sandwich Bags

1. First, I cut equal sized rectangles of fabric and tablecloth. I used an actual sandwich bag for sizing, so that folded in half the rectangles were 1 or 2 inches bigger than a sandwich bag:


2. Next, I placed the two rectangles with the pretty sides in and sewed them together at the ends. Just two straight lines! :)


3. Next, I turned the sewn together rectangles so that the fronts were facing out, and put a strip of velcro on the vinyl side, leaving room on the edges for sewing together later. In order to place the velcro accurately without bothering with too much measuring, I went ahead and stuck an equal size piece of velcro right onto the piece I'd already stuck. Than I could fold the material and just unpeel and stick the other side on.


4. I folded the rectangle with the vinyl/velcro side out (inside out), and sewed the two sides together. Just two more straight lines! :)


5. I turned it back, and the job was close to done, but something had to be done about that inner seam if I was going to carry a peanut butter sandwich in this!


6. So finally I sewed just two more straight lines down the sides with the bag turned right side out to enclose those seams. Here is the final product from the outside:

And from the inside:You can see it is the same size between the seams as a regular sandwich bag:


Just wipe and reuse!I've already tried it. It works great! Of course, you cannot put really hot things in there or heat it.

This has inspired quite a few more "reusable" ideas that I CAN'T WAIT to try! I'll keep you posted. I also found some beautiful "vintagey" fabric at a consignment store that I plan to make more of these with.

Saturday, June 12, 2010

How to Use Prefold Diapers

I see lot's of questions online about how to use prefold diapers. I hope this little play by play of the ways I personally find them easiest to use will help dispel someone's apprehensions of taking this economical route to cloth diapering. I recruited a rather cute bunny for the cause. We'll call him "Fluffy" ;).

Sometimes I simply tri-fold the diaper and lay it in the cover. I primarily do this when I'm using prefolds while out and about.

1. Lay cover out, fold diaper into thirds, and lay in cover. You can also tuck one end under the tab as in the second picture:

2. My daughter has sensitive skin, so I lay a stay-dry liner on top. It does not absorb, but wicks the moisture away from the skin. Most pocket diapers are lined with fleece for this very reason.

*****MONEY SAVING TIP*****You do not have to pay a lot of money for stay-dry liners! I ordered a yard of micro-fleece and cut it into rectangles. No sewing is involved!

3. If I'm changing my baby right then, I just slip it under her and close it up just like a disposable! If I'm going to be out, I'll do that with a few of them and close them up as in the picture below and put them in the diaper bag. This way when I'm out shopping or visiting and have a less than ideal situation for changing, I can put it on just like a disposable! If you want to do this all the time, you can just prep as many as you have covers ahead of time so that they're easy to just grab and put on.

****MONEY SAVING TIP**** If you're really on a budget, consider this. Before I had any pockets, this is how I figured out to diaper my baby on the road very conveniently. It doesn't take any longer than stuffing a pocket diaper! Essentially, it is all the elements of a pocket diaper, just not sewn together. In my opinion, the best covers for using prefolds this way are Thirsties, Thirsties Duos (what you see pictured), and Bummis.


The above method seems to be what is considered the easiest way to use prefolds, but most of the time I use what is known as the "angel wing fold," using a Snappi fastener to hold it together.
Believe it or not, in my home where I have a system down, I find this the easiest. Here's a play by play:

1. I lay baby on the changing table and grab a prefold out of the drawer and lay it flat under her.
2. With baby on the diaper, I "trifold" the bottom part with my right hand while holding her legs with my left hand. Her body keeps the top flared out.
3. Since I use stay-dry liners, I then hold baby's legs down to hold the diaper in place as a reach for a liner and then lift her up slightly to place it on the diaper. (I keep prefolds, liners, and covers in the top right drawer so that they are easy to grab.)
4. Next I lay baby's legs down, which continues to hold the diaper in place so that I can bring it up through her legs.
5. Continuing to hold diaper as shown with my left hand, I grab those little "wings" or "tabs" that you see on the side there with my right hand and slip them under my left thumb and forefinger that are already holding the diaper.6. With my right hand that is still free, I grab the snappi and put it on. To put on the Snappi, you put the claws on one side into the fabric and since it is rubbery, you just take the other side and pull it over and put the claws into the opposite wing of the diaper. Then you pull the bottom claw down and put it into the fabric.
7. Now your hands are free to grab a cover and put it on!(I used a Gen-Y cover in this picture because I've recently found that I LOVE these for using over a "snappied" prefold! The side snaps are great and I love the fabric!)


That is it! I hope this is helpful and assuages some one's fears of using prefold diapers!

Saturday, June 5, 2010

Homemade Cloth Wipes!

A friend gave me a recipe for homemade wipes using select a size paper towels. We used it at first and it worked well. The only unpleasant thing about it was cutting the roll of paper towels in half. (My sweet hubby did that for me! Otherwise it would not have happened.) However, as I got the hang of using cloth diapers and decided that I would definitely be using cloth all the time, I could see how it would be simpler and even less wasteful to just use cloth wipes as well.

I soon found out that you could make cloth wipes from flannel receiving blankets. We had been given quite a few of those, so I decided to try it. I read that you just had to cut squares, put them back to back, and zigzag stitch around the sides, that they would fray at the edges, but that they were for bum wiping for goodness sake!

Well, I guess that's where the choosy comes in. I didn't what them fraying at the edges. So, I sewed them front to front like little pillows, turned them right side out, and then did the zigzag around the edges. I didn't aim for perfection. They're all different sizes. I eye-balled the square cutting. The zigzag lines around the edges took a few detours, but they look great...from a distance anyway! They are, after all, only for bum wiping!


How to make cloth wipes:

1. Sew 2 squares together with the soft fuzzy sides facing each other, stopping before going all the way around so you have room to turn it back inside out. (Sorry I don't know "sew-ese." I guess these are "layman's terms."

2. Turn it inside out and use a pen or something pointy to get the corners completely turned. You can see the little opening I mentioned in step 1.

3.Fold the little opening in as evenly as possible. (When I started doing the zigzag stitch all the way around I started here to secure it in place.)


4. Put sewing machine on zigzag mode and try to follow the edges all the way around. (Of course I tried to be neater with this one since I was taking pictures! :)


5. Done!


It took a long time to finish them between feedings and all the many things a new mommy has to do, but eventually I had a nice size stash of wipes and some good practice sewing that straight line without having to worry about ruining something nice. The best part? They were free!

I keep a hand full at a time of them in a Sterilite container that seals shut. The solution I use is simple and cheap, of course. Here it is:

1.5 cups of boiling water
1Tbs Baby Oil
1Tbs Baby Soap (Such as Johnson & Johnson's Head to Toe)

Pour over wipes and that's it. Let them cool down before using of course!