Showing posts with label Frugal. Show all posts

Wednesday, June 20, 2012

Natural and Frugal Bathroom Cleaning

Contributed by Lorissa of Beautiful Somehow

Clorox Wipes, Windex, Scrubbing Bubbles, Tilex, Pine Sol, Lysol, and Clorox Toilet Bowl cleaner. This is just a small list of all the cleaners we are made to believe we need in order to have a clean and sanitary bathroom. If you don't use every cleaner above then you have a nasty and germ filled bathroom. This is what I believed. I loved using Clorox wipes and Lysol. It killed the germs. Clorox Toilet Bowl cleaner and scrubbing bubbles were toilet necessities! Windex...well that is a no brainer...you get a streak free shine! Mop the floor with Pine Sol and spray the room with febreeze. Squeaky clean and smell good bathroom!

While all of those cleaners do kill germs, they also contain a ton of chemicals. We all know this, yet we still love to use them. I know I did. I just figured all of the talk about chemicals in our cleaners was just a bunch of hype. It doesn't really affect my health that much. Right?

But...did you know that...

The American Lung Association warns that "Some products release dangerous chemicals, including volatile organic compounds (VOCs). Other harmful ingredients include ammonia and bleach. Even natural fragrances such as citrus can react to produce dangerous pollutants indoors. VOCs and other chemicals released when using cleaning supplies contribute to chronic respiratory problems, allergic reactions and headaches ".

The Organic Consumers Association says "Cleaning ingredients vary in the type of health hazard they pose. Some cause acute, or immediate, hazards such as skin or respiratory irritation, watery eyes, or chemical burns, while others are associated with chronic, or long-term, effects such as cancer."


 If you have little ones at home this can be concerning. Think about if one of your little one's get a hold of that bottle of cleaner. That thought alone was enough to make me throw them out. 

Money was another big reason I decided to switch. Buying all of those cleaners, to achieve my sanitary bathroom, was costing a lot! 

Here is what they usually cost...
Clorox Wipes 150 ct. - $7.74
Windex- $2.87
Clorox Toilet Bowl Cleaner- $3.76
Pine Sol- $2.97
Scrubbing Bubbles- $2.47
Tilex- $3.78
Febreeze- $4.97

For a grand total of $28.49! That much to clean a bathroom?! Oh..and don't forget the cost for paper towels to wipe it all down. Even if you do decide to go with the cleaners that are "green" you are going to be paying just as much, if not more!

Okay enough of the why  you should ditch those expensive, chemical laden cleaners. What do you do instead? I still want a clean, sanitary, and pleasant smelling bathroom!


Remember the kitchen and floor cleaner I told you about? Grab that, some baking soda, and either your un-paper towels or even better a mircofiber cloth.

To start out, I usually spray down the whole toilet (inside included) with my lemon vinegar solution and sprinkle baking soda on the inside of the toilet. Let that set while you clean the rest.

I mentioned in my first post on getting started with natural cleaners that I eventually wanted to make my own "Windex". I finally figured out the perfect recipe! It is a little complicated to make and contains a lot of ingredients. Ready....grab your lemon vinegar solution and spray it on your mirror. Wipe with a clean microfiber cloth. That is it. Complicated right. ;-)  It is amazing all the things water and vinegar can do!  (Vinegar Tips.com actually shares 1001 ways to use vinegar!)

I do suggest using a microfiber cloth to clean you mirror. It removes lint and works wonderfully. You can buy a pack of 3 at the Dollar Tree! When you first spray this on your mirror and start wiping, don't panic, it may look like it is starting to streak. Be patient, let it dry all the way, and you will have a clean and streak free mirror!

Then I spray down my sink, counter tops and faucet and wipe clean with the same microfiber cloth. Wipe the toilet clean, scrub the toilet with a brush, spray and wipe down the shower with the water and vinegar solution. Finish with spraying the floor and mopping it clean.

You now have a sparkly cleanfresh smelling, and sanitary bathroom using only two cleaners! Amazing! I love to clean my bathroom this way. It smells wonderful, looks great, and I don't have to worry about harmful chemicals!

What does it cost to clean this way? Literally pennies!


Have you already made the switch to more natural cleaners? Any recipes you love to use in your bathroom?


Monday, June 18, 2012

DIY Chemical-Free Homemade Bug Spray

Contributed by Anna of Not Knowing Where

Our garden has been growing at an incredible rate, thanks to the attentions of my husband, and his right-hand toddler man. Here in North Carolina, the mosquitoes are terrible, especially in the garden in the afternoon/evening. I wanted to make some bug spray for my men to use to rescue them from biting insects, and spiders.

I discovered that making your own bug spray is literally as easy as making a cup of tea. The ingredients are incredibly affordable and have a long shelf life before being mixed together.

I went to my favorite natural health store in town to get the essential oils that are most effective. I've found my local natural health store to be an incredible resource - both for ingredients and for advice. These people really love what they sell, and have much more experience than me. The chain stores (of which we have two) will try to point you to the $20 bottle of all natural, herbal, yada, yada, that they have pre-mixed on their shelf. But this little unimposing store was immediately on board with my DIY desire, and helped me pick out the most effective essential oils.

I decided on citronella ($3.50) and lemongrass ($6.00) for the essential oils. Growing in my garden, I have spearmint and lavender. However if I didn't have these plants I could have puchased them dried at a very low cost.

Here is list of ingredients I used:
  • Water
  • Dried lavender flowers
  • Dried spearmint leaves
  • Citronella essential oil
  • Lemongrass essential oil
  • Rubbing alcohol or Witchhazel
At home, I boiled 8 oz (1 cup) of water. I poured the boiling water over 2 tablespoons each of dried spearmint and lavender. I used a mug just like I was making a cup of tea, and covered the mixture to steep. After it cooled to room temperature, I strained out the herbs. To my herbal "tea", I added 14 drops of citronella and 7 drops of lemongrass.

Finally, I poured the whole thing into a spray bottle. For ease of evaporation, I decided to add some rubbing alcohol. Witchhazel is another (but more expensive) option if you want the spray to more quickly evaporate on the skin. I added enough rubbing alcohol to produce 10 oz total of bug spray. This is a minimal amount. Some people double the amount of liquid by adding much more alcohol or witchhazel.

It cost me less than $10, and will make enough bug spray to last many, many, months of summers. No harsh chemicals, inexpensive, and effective!

Wednesday, May 30, 2012

Because It's Fun, Adventures in Mixing Makeup


Contributed by Anna of Not Knowing Where


Did you know that you can create your own makeup from items that you probably have in your kitchen right now? Recently, Wellness Mama wrote a post about just that. I spent the following weekend scattering a multitudinous amount of colored powders across my kitchen and bathroom, in an attempt to concoct my own blends. I tried most of her suggestions. I made several happy discoveries, and experienced a few disappointing revelations. It was a little trickier than Wellness Mama's simple post made it appear.

"Why in the world," you may ask, "are you mixing your own makeup?"

Three reasons. One - My skin has developed allergies to just about every product that is found at a drug store. Two - I've always disliked the fragrances of cosmetics. Three - Mixing makeup just seemed like a lot of fun. What can I say, I do strange things on Friday nights after the toddler is in bed.

Inspired by an expert, here are my stumblings in creating makeup in my kitchen...
Foundation Powder, Eye Shadow, and Blush
 Here is the initial color pallette of my endeavor:
  • White: corn starch
  • Brown: cocoa powder
  • Orange: cinnamon
  • Red: dried hybiscus
  • Black: activated charcoal
In addition to lightening up the makeup, the corn starch is integral to absorbing the colors and spreading them on your skin. My skin also happens to thrive on the corn starch. Go figure. Whereas makeup I've bought has always made me break out, this stuff actually keeps breakouts at bay. Crazy!

For the foundation powder, I mixed cocoa powder and cinnamon into the corn starch until I was happy with the color. The corn starch and cocoa powder both tend to clump. A tea infuser worked as a sieve to break apart the clumps and help it mix. 
I used the skin on my arm as a guide as I alternately mixed cinnamon and cocoa powder into the corn starch for the best shade. 
For the eye shadow, I started by emptying one capsule of activated charcoal into a small bowl. To the black, I added cocoa powder and cinnamon alternately until I found a brown I was happy with. 
The activated charcoal plays a similar role as the corn starch. It is a smooth base that helps the makeup stick to the skin.

The blush works a little bit differently than the foundation and eye shadow. The red from the hibiscus requires a small amount of moisture to get absorbed into the corn starch. I ground the hibiscus into as fine a powder as I could get. A coffee grinder is perfect for this. I sifted the hibiscus through the tea infuser into a small bowl. It was about 1 tablespoon. Then I added an equal amount of corn starch to the red powder. Next, I added a very small amount of water. No more than 1/4 teaspoon. I mixed well with a spoon, then I started using my fingers to work the hibiscus and corn starch together. 
The result was a bright pink powder. Continuing to use my fingers, I added cocoa powder, more corn starch, more hibiscus... until I was pleased with the shade.

The most expensive part was the activated charcoal. It cost $9 at a health food store. However considering I have enough to make a lifetime of eye shadow, I figure it was $9 well spent. Hibiscus was $2 for an ounce at my local health food store. An ounce of dried flower petals is more volume than you would think. It may make ten batches of blush.

Making makeup in your kitchen is super cheap, and a lot of fun for the artistically minded. Have fun!

Monday, May 14, 2012

The Cheapest Chalkboard Labels and More!

I mentioned before that the possibilities of chalkboard contact paper are limitless. That being so, I had a bit more fun with the roll I bought.

First of all, I had not too long ago ordered chalkboard labels for my kitchen canisters. I think they look very cool and are so practical in that they allow you to change the contents of any given canister without peeling off a sticky label.

I bought the cheapest labels I could find on Etsy, but they were still fairly expensive for what they are. I love them except for the fact that they are so small you cannot fit two words on them, like "white flour," "wheat flour," "brown sugar," "white sugar," etc.


 This chalkboard contact paper gave me a MUCH cheaper solution, tailored more to my purpose. I had one canister not yet labeled, so I made a label for it, and will eventually replace the smaller ones on my other canisters as well. (You can see the sheet of smaller ones I bought on the left edge of the picture for size comparison.)

*****************************


Another simple and fun use of this chalkboard contact paper is to re-purpose any picture frame to make a decorative framed chalkboard for verses, quotes, lists, or whatever you want! I just simply covered the glass with the contact paper! Smaller versions of this would make great economical yet thoughtful Christmas presents. ;)


******************************

And finally, I was able to make bigger chalkboards for my children's Bible memory verses by simply plastering a large chunk of chalkboard contact paper on the wall! I just traced a large frame I had for the basic shape and then cut dips out of the corners and done!


Yay for really cheap, easy, yet beautiful things!!!!!!!


Linking with: Growing Home and  Raising Homemakers, and Frugal Friday @Life as Mom.

Tip Junkie handmade projects

Monday, May 7, 2012

Space Saving DIY Toy Stove and Art Easel {Chalkboard Contact Paper}


We have a small home, and I am more than content with that. However, my two and a half year old daughter is getting to an age where a toy kitchen would be an ideal toy for her, but there simply is not room.

My daughter "Peanut", being the creative and imaginative girl that she is, found a solution for that!

We have a small bed side stand type cabinet in her room that I once used for her books (which are now on a book shelf). One day Peanut started opening the door and putting her toy cupcakes in the cabinet to "bake" them, pretending that it was a stove.

I looked at the little cabinet and thought, "I can paint four burners on top and paint the front black so that it looks like the window into a stove!"

Since I have very little experience painting, and very little time right now, I thought it would be a long time before I would get around to such a project.

That was until I discovered Chalkboard Contact Paper.  The little stove is the first thing that came to mind. How easy it would be to just cut out four little circles and stick them on, as well as the front "window" of the stove?

I ordered a roll of the contact paper for less than eight dollars, and as soon as possible after the contact paper arrived, I did just that. It took about 15 minutes, and that because I was doing other things at the same time.

I also ordered a little cooking set, and now my daughter has a little stove to cook on without adding a mite of furniture to our home!


Another toy that I have thought would be ideal for my daughter if there were sufficient space is a toddler art easel. We have a little toddler table for tea parties and artwork, so for both reasons of space and the fact that we really don't need another place for her to draw and color, I had let the idea go completely.


But alas, we have an exposed side to our large old refrigerator in the kitchen and it occurred to me that I could made it into a little chalkboard! Since it's magnetic, we can also use magnets to secure paper there for her to write, color, or paint on too. There you go! The primary functions of an art easel only without a tray for supplies. I am thinking of ways to attach something to hold chalk and markers to the fridge, but for now I prefer to not have them laying about freely anyway.


 The possibilities of this amazing contact paper are endless! I have a few other things I can't wait to do with it!

Super cheap. Super easy. Super fun!

*******************

Tip Junkie handmade projects

Friday, March 18, 2011

Guest Post by Tom.com: Frugal and Natural Garbage Disposal Cleaning

If your fridge is anything like ours, sometimes you have interesting science experiments going on after a few weeks. Whenever we clean out the fridge, a lot of old food goes through our garbage disposal before hitting the sewer system. A commonly suggested way to keep the disposal clean is to throw ice chips into it every so often. To keep the disposal smelling nice, throw in some peels from a piece of citrus.


We will sometimes buy lemons for other cleaning around the house, but we don't use the whole thing. We used to keep the rest of it around until the next major usage of the garbage disposal, but they would go bad.

To reduce the wast, what we did was slice up the leftover lemon and put it into a container in the freezer. Whenever we start smelling the disposal, we pull out a slice of frozen lemon and throw it in to the disposal. It takes care of both the ice and citrus suggestions while reducing our waste of lemons.

(In case you didn't know, Tom.com is my hubby. :)

Friday, February 25, 2011

Homemade Yogurt in the Crock Pot!

Boy, have I learned a lot in the past 48 hours or so! First of all, I've been back and forth about whether to bother making my own yogurt or not because all the recipes that I could find that were supposed to be "easy" did not look so "easy" to me! Why? Because checking the temperature and keeping it just right for hours is something that this "global" mom would never be able to stay on top of. Yes, I always have multiple things going on at once but that level of attention to detail is beyond my ability and makes me nervous! I would have to stand there the whole time. I would never remember to check otherwise. I know that you can get a system down with trial and error and find a way to incubate yogurt without having to check, but I was dreading the trial and error and all the potential waste of milk and time in the process. I even have my mom's old yogurt maker that works really well, but we go through it SO FAST that I would have to make it so often since that makes a pretty small batch compared to what we use.

I saw a recipe once for making yogurt in the crock pot, but so many of the comments were negative, saying that it had come out runny, that it discouraged me. I lost my motivation.

Until this week. The fact that we go through yogurt so fast had gotten me thinking about really doing this some way in which I can make bigger batches.

Then I discovered, "A Year of Slow Cooking." I know, I know, I'm way behind the times, but I'm SO excited! That blog will become one of the three cookbooks I'll be using for a year starting in April. (I'll share the other two in a later post.) Stephanie's enthusiasm and results along with the many positive results shared in the comments motivated to try this, and as she would say, "It works! It really really works!"

My daughter and I enjoyed the tastiest most perfectly textured yogurt today that I have had in a long long time...if ever!!!!!!!!! THANK YOU STEPHANIE! My fingers aren't quite shaking, but I'm very very excited, which is why I'm writing this post right now when I should be doing a lot of other things!

I won't repeat all of Stephanie's recipe, you can just check it out here. I will describe how I "sorta kinda" adapted it.

1. I heated a half gallon of whole milk on low fro 2.5 hours as the recipe called for.

2. The next step was to unplug it and let it sit for three hours. I didn't exactly follow this because I have the thermometer that goes with my mom's old yogurt machine that is perfect for global folks like me and doesn't even have numbers! It just has an arrow signaling, "When the temperature is here, mix in the starter!"  Love it!

Therefore, I took off the lid and let it sit a while and checked a couple of times...not sure how much time went by, I think it was about an hour, but the temperature was just right the second time, so I scooped out two cups of it into a separate bowl and mixed in a half cup of store bought yogurt.

3. Then, since I knew it was at the perfect temperature, I put the lid on the pot and wrapped that sucker in TWO HUGE towels as airtight as I possibly could, because I knew it needed to not get any cooler.

4. Then I just forgot about it. The this morning, around 7:30, I remembered. I hadn't been in the kitchen yet because my dear husband brings me a mug of coffee as I stagger to a chair in the living room in the mornings where I remain with my coffee until Lydia wakes up and/or I remember that yogurt is incubating on the counter! For this reason, it was incubating for about 12 hours. I'd meant to leave it for only 10.

When I opened it up I saw clumpy yogurt with liquid separating it a little. I was excited because I knew this meant "not soupy." Yay! This was after stirring a tad:
 

This is where I reveal what a rookie I am, but it wasn't until yesterday that I learned that you call that "liquid" whey. I had tried to print out Stephanie's post, forgetting there were 400+ comments, and needless to say, it ran out of paper before even finishing the comments. I did scan the comments and that is where I learned what whey was and that you could use it for other things, like baking bread.

I did a quick search on uses of whey and got some great information really quickly. I knew I wanted to get some of that whey out for a bit thicker consistency of yogurt, so first I tried using our coffee sieve and scooping out a bit at a time and letting the whey drip off. I quickly learned that this was not going to work.


I thought I needed cheese cloth but I tried using one of our buffet style cloth napkins that we use as kitchen cloth because it is thin. I wet it, wrung it out, and laid it in a colander which I sat on a bowl. I emptied the crock pot of yogurt into the colander and sat it in the fridge for an hour or two. I know that's a broad range, but that's just how I work.


I was so excited when I pulled it out. The yogurt was just right, and I had about 2 cups of whey. Exactly the amount that I needed to substitute whey for water in my easy homemade bread recipe (which I'll be posting some tips on soon).  I learned from my earlier search that using it instead of water to prep the yeast would make the bread moister and add some protein. I'm excited about all of the potential uses of whey, a great list of which you can find in this discussion on Chow Hound. It led me on a search about how to make mozzarella cheese, which I might just try after our trip to Brazil!


So finally I had a big bowl of yogurt in the fridge and a nice bit of whey on top waiting for the bread baking, which happened to be today since we just ran out.


I was distracted and left out a couple of important steps in the bread making and we were short on yeast. It's cooling now, but I don't expect the results to be stellar. I will try again and let you know how it turns out!

All in all, I can see this EASILY becoming a weekly routine! Set milk in the crock pot  on low for a couple of hours around dinner time. Take the lid off and let it cool, keep check, but it should be ready in an hour or so to mix in a tad of last weeks yogurt. Then wrap it up in two towels and forget about it until the next morning. Save the whey and make bread for the week as well. LOVE IT!!!!!!!!!!!!!!!!!!!!!!!!!!!!!

Scratch yogurt off my grocery list! Woo Hoo!!!!

Friday, January 21, 2011

Simplifying and Creating Space with Hanging Jewelry

I love getting rid of things. I like getting rid of clutter. It takes a lot of effort as I'm not the most organized by nature, but it's so refreshing to travel light. Less is definitely more in my book.

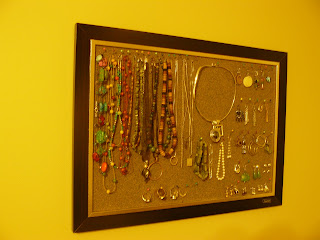
Some time back I saw a friend's bedroom and noticed she had all of her jewelry hanging on pins on a corkboard beautifully covered with fabric and ribbon.

I had my jewelry in a medium sized jewelry box on a small shelf in our room. Since we have a big closet, we'd already moved our desk and desk top computer in there to create space in another room, and I was ready to get that little shelf into the closet as well since there was a perfect spot for it that was otherwise unusable space. The only problem was where to put the jewelry box. I knew it was time...jewelry on the wall, jewelry box out of here!

I was going to make a fancy one, but I found an attractive one for 8 bucks or so at Wal-Mart that matched our color scheme well. Yet again, less is more! Here it is:


I should also make a rule that if it can't fit attractively on this board, I shouldn't have it, or should get rid of something else!

Friday, January 14, 2011

Homemade Ranch Dressing: Good News for the Tastebuds, Not so Good for the Waistline

Do you love Ranch dressing, but would like to know what's IN your Ranch? You can make your own just about as quickly as you can whip up a batch out of a pre-prepared packet!

Some time back, I posted about my deliverance from my Ranch dressing addiction brought about by an equally yummy homemade olive oil and garlic salad dressing. That was all well and good until recently.

We had baked chicken the other day, which made me really crave some Ranch because I LOVE it for dipping baked chicken in. I decided to look on line and see if there was a recipe for homemade Ranch. I was doubtful, but my husband told me that there was. He follows Hallee Homemaker's blog and had seen it there.

I went and found it and within 10 or 15 minutes, had a cup of the most delicious Ranch Dressing I'd ever tasted! That's how quick and easy it is, and yes that means you don't need fancy ingredients because obviously we already had everything needed!


I couldn't believe it was that simple. Now I'm really happy because if God ever calls us to another country, I can make Ranch Dressing! I've already shared it with one friend living overseas and plan to share it with more. That is so exciting to me. Yay!

 Here's the recipe:

⅓ cup mayonnaise
⅓ cup plain yogurt (or sour cream)
⅓ cup buttermilk (I just use whole milk because that is what we keep around)
¼ tsp salt
¼ tsp fresh ground black pepper
¼ tsp garlic powder
¼ tsp onion powder
½ tsp dried parsley flakes
½ tsp dried dill

Stir it together and store in whatever you please. Chill and serve on whatever you fancy. :)

Yum!

Friday, December 31, 2010

Pregnancy Tests for $1!

Recently, I shared the news that Dollar Tree had microfiber towels, which are great for dusting, swiffing, and stuffing cloth diapers. That was the first time I'd been to a Dollar Tree in ages. What I didn't tell you is that the reason I made that trip in the first place.

I went because a good friend told me that she got her pregnancy tests there, for a dollar of course. The awesome thing is that either her doctor or a nurse told her about it! Turns out, that is where at least that doctor's office gets their tests. I don't have any cited source or research, just word of mouth. However, I don't doubt it since I found that Dollar Tree does have a website from which you can order in bulk!

I've been using these, and they seem to work fine. This is great news if you're hoping to have a baby and want to be able to check more often without throwing away $15-$20 every time!

Friday, December 17, 2010

Taking the Surprise Factor out of Christmas

We only buy gifts for immediate family in order to keep it simple, and I *try* to make handmade gifts for extended family and friends each year. (This year I've made a few, and the relative silence on the blog is me trying to make some more!) In spite of all this, Christmas came as a surprise to us last year, and the year before, and the year before, and...


We ended up buying gifts using a credit card, and ended up carrying a balance for a couple of months, because we didn't think about it until...December!

My husband and I both have always had frugal "tendencies," better said,"intentions." Neither of us would make big purchases without serious thought and prayer and would always look and wait for an amazing deal. Neither of us enjoy shopping. As a matter of fact, we both rather loathe it. We don't feel a need or desire for a big house and new fancy everything. My motto is "less is more." I've always wanted to travel light, and not accumulate a lot of "stuff". I'm the opposite of a pack rat, I go through closets and drawers periodically looking for things to give away, throw away, or sell. My mom used to go through the trash cans after me and pull things back out. (It's really amazing that I still struggle with being messy in spite of this. I've been wanting to get rid of all furniture that provides a place to put random things and get cluttered up, like our dresser. I don't think we need it, but my husband is not convinced! He definitely will not let me get rid of the kitchen table. I can't imagine why! ;)

All this said, because of our lack of need to "keep up with the Jones," we fancied ourselves quite frugal, but in reality, in spite of my husband's disciplined attention to our finances and wonderful organization, we still managed to only be able to save very little relative to what we should have been able to and we would regularly "get in trouble" come Christmas or any other totally "unexpected" need or occasion.

This year we took Dave Ramsey's Financial Peace University, and gleaned a lot of ideas and insights that have pretty much revolutionized the way we handle our finances. We learned that in spite of our mindset, we were still not living frugally. This will be the first in a series about some of the things we've learned and practical examples of how it works for us.


As a result of that course, this year we started a "Christmas Envelope," putting a little in each month since. It has been WONDERFUL to have that envelope and know exactly what our limits are and to be prepared. It has made this season much more peaceful so far, and most of our gifts are wrapped and under the tree in record time! :)


I will discuss in coming weeks the four essential things that have changed our lives in more ways than just finances:


1. A new perspective on debt and credit.


2. A zero based monthly budget.


3. What I like to call "The Envelope System"

4. A bigger than ever desire and passion for giving.


Stay tuned!

Friday, December 10, 2010

Swiff and Fluff on the Cheap!

 As we have all hard floors I had become quite a fan of the Swiffer Sweeper. I also used the Swiffer cloths for dusting. We went through them very quickly until some time ago I saw an article on the Diaper Pin about using microfiber cloths (typically sold the auto section of most department stores) in the place of disposable Swiffer sweeping cloths.

This is my most recent microfiber towel that I haven't cut yet.
While at a discount store I picked up a super cheap microfiber cloth and tried it out. It was amazing, doing exactly what the Swiffer cloth did only...it was reusable! I just shake off the excess dust over the trash can and then toss the cloth in with the dirty towels.


The microfiber cloth was a little large for my purposes so I cut it in half and did not sew the cut side to see if it would fray and after washing it for months, it has not frayed at all!

Later, I received a Nykibaby One Size pocket diaper for review from Monkey Toe Diapers that came with a microfiber towel as an insert. I discovered that it was a very absorbent and trim insert. I didn't even realize how cheap the towels were at the time, but was seriously hoping to find more to use as inserts!

I didn't have to wait long! On a recent trip to Dollar Tree and discovered that they have microfiber towels for a dollar each!


I snatched up a few white ones for dusting and sweeping and a few pastel ones for stuffing and fluffing my pocket diapers. They work SO well and are so cheap. PERFECT for adding serious extra absorbency to an overnight diaper!

And yes I did match them on purpose...pitiful I know! I also have a purple diaper and a purple cloth but it was dirty! :)


Thank you Dollar Tree!!!!!!!!!!!!!!!!!!!!!!!!!

Wednesday, November 17, 2010

Washing Cloth Diapers and an HE Frontloader: Problems and Solutions (Prelude to Rockin' Green Review and Giveaway)

Cleaning cloth diapers is simply not simple, at least not if you have an High Efficiency Front Loader washing machine. Just about every person you ask will have a different answer about what did or does work or not work for them, even among those who've been doing it for a long time. There are so many types of washers, water, and detergents, not only that but you never know the history of the diapers in question, and what kind of residue they may already have. I could make a list a mile long of factors that can influence cleaning diapers, but I don't have time to write a mile long post. :) I've got a half mile to go as it is...

Several months ago, I posted about what I'd learned so far about washing cloth diapers in an HE Frontloader, including the necessity (for me) to use "clean rinsing" detergent, the help of adding a large wet towel, and the help of using a diaper sprayer. At that time, I had  completely ceased to have issues with detergent build up (so long fishies!) and for some time enjoyed my diapers coming out of the wash smelling gloriously of NOTHING (this is how you know they are clean), and even after wet on, they smelled only of pee (this is how you know they are REALLY clean). I thought I had it all figured out!  Until...

Enter Ammonia.

I'd heard that pee eventually turned to ammonia as it sits, and not until my baby was at least 6 months old or so did I learn what that smelled like. Back to the Diaper Pin forums I went.  It wasn't too bad at first, only in overnight diapers and in the pail when it was time to wash did I smell it, but then it began to be an issue even after a diaper had been in the wet bag for a few hours while we were out on the town. It began to intensify and I was beginning to realize I had a problem.

I knew that some level of ammonia smell was normal, to be expected, and not necessarily a problem. I asked around to find out what was "normal," and the consensus seemed to be that it's normal in the overnight diaper (unless it's strong enough to burn your nose or something), normal in the pail after a day or too, but NOT normal if it is smelling like that in the wet bag after just a few hours and as I already new definitely not normal if you could smell it immediately after the diaper is wet. Fortunately, I've not gotten to that point.

However, it was an unavoidable fact...I had some ammonia build up. Now, what to do?

All HE Frontloaders are not created equal. I've looked it up so very many times and I often hear "use this setting or that setting, mine does this or that if you do this or that," and found none of those scenarios to be true for my washer. I've read the user manual front to back numerous times, and had almost become convinced that it was impossible to get cloth diapers PERFECTLY clean in my washing machine.

I had started or continued doing few things that had helped keep the problem from getting out of hand, and I still find them necessary to do, but they are not sufficient in themselves:

1. Spray out even just heavily wet diapers before putting them in the pail. Not only does this go ahead and rinse out some of the urine, it also makes the diaper already saturated when going into the washer so that they do not merely absorb all the teesie bit of water that the HE Frontloader puts in!

2. Throw a huge wet towel into the wash.

3. Wash at least every 2.5 days...

4. Do a delicate wash first (in place of the cold wash or rinse generally prescribed), because the delicate cycle uses more water than any other cycle (on most machines). This gives a better rinse than I had been getting. (I'd tried both doing a quick wash cold, regular wash cold, and just cold rinse.)

Though these things helped, and made my diapers tolerable, there simply was not enough water getting through my diapers. I had decided I was going to drive 1.5 hours to my parents house and hang out for a day or two and wash wash wash. That was after planning to do it at a laundry mat, which seemed like a great idea until I realized that there was no way I could have my not walking yet but crawling everywhere and eating every minute particle off the floor baby there all day!

(For those of you new  to cloth...please don't be scared away from cloth diapers...this kind of stripping only needs to be done once in a while...and you can make it a LONG while with clean rinsing detergent and...well...not having my washing machine.)

There were a couple of options before me, both of which came highly recommended.

1. RLR

2. Rockin' Green

I ordered the RLR, but did not use it right away because I felt that I would only know if it really worked if I tried it in a different washing machine or figured out how to get more water going through mine. Not long after this I wrote Rockin' Green to see if they'd be interested in working with me on a review of their product.

THEN, I heard some exciting news. I learned from this post on The Cloth Diaper Whisperer, that it is possible to add water to your machine through the detergent dispenser! The couple who wrote the article had the luxury of a sink in their laundry room, and were able to use a hose to add the water. I had to use a bucket, and yes some splashing was involved, but IT WORKED! I found that if I added two or three bucket fulls (depending on the size of the load) I could actually SEE the water moving around the dipes! I was very excited. I'm looking for a large watering can with a spout that doesn't have the "sprinkler" attached, which will make pouring in the extra water mess free.

I started doing this, and though I still had the ammonia smell, it definitely was NOT getting worse. This was no surprise to me since I knew it was a BUILD UP problem, and required stripping. Now I just had to figure out how to get that 'ol build up outta there!

I had finally heard back from Rockin' Green and they were going to send me a few samples of their product for review.

I had a choice to make. RLR, or Rockin' Green?  I decided to wait on trying the RLR, and give the Rockin' Green a chance first, especially since it was supposed to remove build up by SOAKING rather than stripping (and because I had to write a review of it :).

You'll hear the rest of the tale , or at least the next chapter, in my soon upcoming review and giveaway of Rockin' Green Soap!

Friday, October 15, 2010

"Guest" Post by Tom.Com: Military Showers

Just so you know, Tom is my dear husband, affectionately dubbed "Tom.Com"for his uncanny amount of knowledge about random things (I go to him before google!),  who has graciously agreed to contribute to The Cheap and Choosy with some great tips for Frugal Fridays! Without further ado...

Earlier this year, I went to Haiti with a group from our church to do some construction. The compound in which we stayed had showers that were fed from a cistern on top of another building. The cistern was expensive to fill, so we had to ration water. Thankfully, I had heard about the so-called "military" shower, but I had not done one until the week in Haiti. As the week went on, my anticipation for a long hot shower grew. And when I got home, I went to take a shower almost immediately. I turned on the water and started lathering up, but there was a check in my spirit. The water that was going down the drain was doing nothing except providing a small measure of comfort. I couldn't, in good conscience, continue wasting it, and I turned it off and finished the shower. I have continued the military shower since then, though, I must quickly admit that I have not always been quick to shut off the water after I finish rinsing.

If you have not already heard of the "military" shower, here it is:
1) Run the water long enough to get wet then shut it off.
2) Lather up with shampoo and soap.
3) Run the water long enough to rinse off.

It's a pretty simple process. It will help save on the water bill. It will help save on the gas/electric bill (depending on your hot water heater type). It has helped to continually remind me of the blessings afforded to us in this country that others don't readily have.

Sunday, September 12, 2010

Saving With Bunch Spinach {MPM}

We eat a lot of Spinach salad, mostly as an excuse to eat our yummy homemade salad dressing :). I love the health benefits of spinach too, though!

I used to buy baby spinach in a bag because it was so convenient and perfect for salad, but then I saw things on the news that were a bit disturbing about bagged salad, so I started buying bunch spinach. At first I found preparing it for salad to be a bit cumbersome, tearing the stems off by hand and tearing the leaves into bite size pieces. Finally, I had an idea that made it super easy and perfect for salad!
Before taking of the binding around the stems, I lay it on the cutting board and start slicing it, just as if it were a tomato or onion.


I slice it all the way down to the stem in about 1 inch slices, then put the stems in the back of compost stuff and the sliced leaves, which are now perfect size for salad in a colander to rinse thoroughly before saving out the amount needed for our salad that night and putting the rest in a bag in the fridge for later.


It's easy, less expensive, safer, and just as perfect for salad!


This week's menu plan:
Monday: Leftover Curry or Beirrocks
Tuesday: Empanadas
Wednesday: Chop Suey (Lentil sprouts are being grown as we speak!)
Thursday: El Burgos or Pakinstani Kima
Friday: Off to visit family for the weekend!

Monday, September 6, 2010

So Long,Pillsbury! {Menu Plan Monday}


By the time I finish this post it may become "Menu Plan Tuesday" as I'm busy trying to adjust to life with a crawler and no more morning nap (unless it's just the teething).

I will continue with Menu Plan Monday, because my family needs to eat, and it provides a motivation and accountability to sit down and plan out meals and make a grocery list accordingly. This prevents a ton of stress for the rest of the week. Otherwise, you would find me around 5:00 or 5:30 p.m. with my usually by then tired baby (and all that that implies), scratching my head, looking into the fridge and pantry asking myself, "What in the world am I going to cook for dinner?" Then, hubby would come home to a frazzled frustrated wife and no hope of dinner anytime soon. He's so sweet that he would not complain or criticize, but I'd be frustrated and as we all know, that's not a fun state to be in.

Oh and about that grocery list made according to my menu plan...have I mentioned that my grocery list is SOOOO simple thanks to More With Less Cookbook? The simple list of things we get weekly or bi-weekly covers many many recipes in the book. At most I get one or two things a week that I buy with one specific recipe in mind, and usually can use it for a few other recipes too. The rest are staples that go in a variety of recipes...and did I mention that they're mostly low cost ingredients as well? Just Sayin'...

I believe I have mentioned that before More With Less, I could barely cook. That is not entirely true, but my list of recipes that I felt confident about was very short, ie maybe 4, and most of them, if not all, involved some pre-made food or another as a main ingredient.

One of the recipes that I loved and served to everyone who came over for dinner at some point (sorry friends if you had it twice...or..thrice...or...yikes!) is affectionately known to us as "Chicken Crescent Rolls" or to our Spanish or rather Spanglish speaking friends as "Bolitas de Chicken."

It was passed on from a family friend, and may have originally come from the back of some some Pillsbury product or another because the essential ingredient was Pillsbury Crescent Rolls.

Do you know that it never occurred to me that I could make the dough myself? I remember thinking many times, "What would I do if we moved to another country? I wouldn't be able to get Pillsbury Crescent Rolls!" It's sad I know, but it's the truth.

Then one day, I was looking through...you'll never guess....More With Less Cookbook, and I found a recipe that looked very similar to my beloved Chicken Crescent Rolls, except...wait a minute...you use biscuit dough? Don't tell me they're just basic biscuit dough! But, sure enough, that turns out to be the case and I realized that you don't need some fancy recipe or ingredients.

So, I finally got around to trying Chicken Not Crescent Rolls without buying refrigerated dough! And guess what? It was easy! I spent about 5 minutes making the dough and maybe 2 extra minutes rolling it out. I dirtied about 2 more dishes, and felt no worse for the wear.

Here are some way overly processed pictures of the experience. I got a little carried away with Picnik. (It's so much fun!) The food may be less processed but the pictures definitely are not!

Here's the ball of dough I prepared first and put in a bowl in the fridge while I got everything else ready.


While doing this I had some chicken boiling, and then chopped it up. I used about 4 breasts. I was going to save some aside to freeze in 1 cup portions for other recipes, but forgot. So we ended up with LOTS of chicken balls!


Then I mixed in half a bar of cream cheese, a dash of salt, a dash of pepper, and a bunch of dried oregano and basil


Next I rolled out the dough and used a mug to cut circles. We don't have cookie cutters so I always use cups or bowls. They work great and offer a pretty good variety of size options! Yay for things you don't really need!!!


Then I grabbed a ball of the chicken mix and placed it in the middle of one of the discs of dough and wrapped it up. I found it actually easier to work with and stretch around the chicken than the refrigerated dough! In the background you can see the bowl of melted butter and the bowl of homemade italian breadcrumbs that I roll the ball in once it is formed.


Finally I ended up with two 9x9 baking dishes full of these yummy things.


With the store bought dough, you cook it for 25 minutes. I found that these needed a bit longer. I forgot to set the timer so I'm not sure how long. We just went based on the look. Next time I'll start with 30 min. and go from there.

So, Scratch Pillsbury Crescent Rolls off my list...FOREVER! Yay!

This week.....

Monday: Chick Fillet :)
Tuesday: Homemade Pizza
Wednesday: Pakistani Kima (pg. 131, More With Less) (We tried this last week...Y.U.M. and really quick!)
Thursday: Beirrocks (pg. 144, More With Less)
Friday: Lentil Barley Stew (pg. 107 More With Less)
Saturday: El Burgos (pg. 138 More With Less)

Monday, August 30, 2010

Homegrown Fresh Herbs {Menu Plan Monday}

I finally used our home grown oregano and basil in homemade spaghetti sauce enhanced with a basic white sauce that serves as a substitute for cream of "whatever" soup! Here are some pictures of the herbs from pot to sauce :).


This weeks menu plan: (Busy day today so not too much detail on the menu plan.)

We finally bought some chicken! (Did I mention that since I began to use More With Less cookbook, I've only had to buy meat TWICE?? I need to check, but I'm pretty sure it's been AT LEAST two months!)

I hate dealing with raw chicken, and again, thanks to More With Less Cookbook, I have even more ways I can use already cooked, chopped chicken!

Monday: Leftovers
Tuesday: Chicken Crescent Rolls
Wednesday: Creamed Chicken over Rice
Thursday: Chicken Curry
Friday:Beirrocks
Saturday: Vietnam Rice (with leftover chicken and leftover rice)
Sunday: Lentil Barley Stew