Showing posts with label how to. Show all posts

Wednesday, June 16, 2010

Homemade Reusable Sandwich Bags

*Update: After initially writing this post I started making these with water resistant ripstop nylon on the inside. It is more food safe and much lighter for an all together better result! I currently use ripstop nylon to make super compact travel diaper changing pads for sale in my Etsy shop, Seams to Streams.*


When I learned of the existence of reusable sandwich bags, I went googling to see what it was all about. I found this blog with a very user friendly tutorial on how to make reusable snack bags yourself. I saw elsewhere (can't remember where), that someone had made a sandwich wrap, but lined it material from a vinyl table cloth instead of PUL.

We had a vinyl tablecloth I was getting ready to get rid of! I preferred the sandwich bag idea over a wrap, so I combined the two ideas. I also had a couple of big pretty cloth napkins that had been given to me for sewing, so I used those as the outer fabric.

How to Make Reusable Sandwich Bags

1. First, I cut equal sized rectangles of fabric and tablecloth. I used an actual sandwich bag for sizing, so that folded in half the rectangles were 1 or 2 inches bigger than a sandwich bag:


2. Next, I placed the two rectangles with the pretty sides in and sewed them together at the ends. Just two straight lines! :)


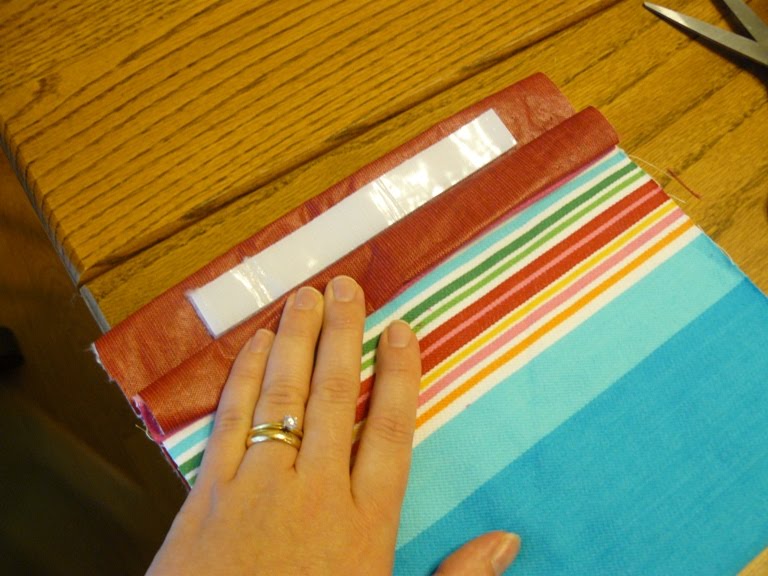
3. Next, I turned the sewn together rectangles so that the fronts were facing out, and put a strip of velcro on the vinyl side, leaving room on the edges for sewing together later. In order to place the velcro accurately without bothering with too much measuring, I went ahead and stuck an equal size piece of velcro right onto the piece I'd already stuck. Than I could fold the material and just unpeel and stick the other side on.


4. I folded the rectangle with the vinyl/velcro side out (inside out), and sewed the two sides together. Just two more straight lines! :)


5. I turned it back, and the job was close to done, but something had to be done about that inner seam if I was going to carry a peanut butter sandwich in this!


6. So finally I sewed just two more straight lines down the sides with the bag turned right side out to enclose those seams. Here is the final product from the outside:

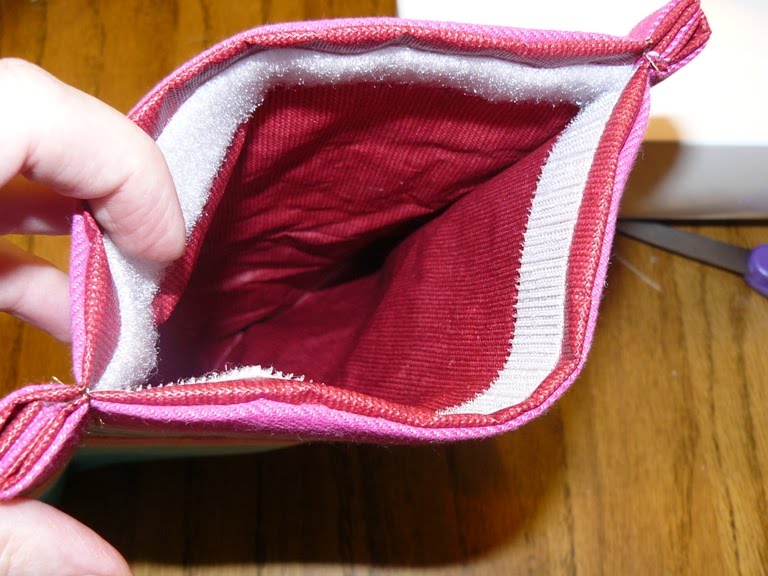
And from the inside:You can see it is the same size between the seams as a regular sandwich bag:


Just wipe and reuse!I've already tried it. It works great! Of course, you cannot put really hot things in there or heat it.

This has inspired quite a few more "reusable" ideas that I CAN'T WAIT to try! I'll keep you posted. I also found some beautiful "vintagey" fabric at a consignment store that I plan to make more of these with.

Saturday, June 12, 2010

How to Use Prefold Diapers

I see lot's of questions online about how to use prefold diapers. I hope this little play by play of the ways I personally find them easiest to use will help dispel someone's apprehensions of taking this economical route to cloth diapering. I recruited a rather cute bunny for the cause. We'll call him "Fluffy" ;).

Sometimes I simply tri-fold the diaper and lay it in the cover. I primarily do this when I'm using prefolds while out and about.

1. Lay cover out, fold diaper into thirds, and lay in cover. You can also tuck one end under the tab as in the second picture:

2. My daughter has sensitive skin, so I lay a stay-dry liner on top. It does not absorb, but wicks the moisture away from the skin. Most pocket diapers are lined with fleece for this very reason.

*****MONEY SAVING TIP*****You do not have to pay a lot of money for stay-dry liners! I ordered a yard of micro-fleece and cut it into rectangles. No sewing is involved!

3. If I'm changing my baby right then, I just slip it under her and close it up just like a disposable! If I'm going to be out, I'll do that with a few of them and close them up as in the picture below and put them in the diaper bag. This way when I'm out shopping or visiting and have a less than ideal situation for changing, I can put it on just like a disposable! If you want to do this all the time, you can just prep as many as you have covers ahead of time so that they're easy to just grab and put on.

****MONEY SAVING TIP**** If you're really on a budget, consider this. Before I had any pockets, this is how I figured out to diaper my baby on the road very conveniently. It doesn't take any longer than stuffing a pocket diaper! Essentially, it is all the elements of a pocket diaper, just not sewn together. In my opinion, the best covers for using prefolds this way are Thirsties, Thirsties Duos (what you see pictured), and Bummis.


The above method seems to be what is considered the easiest way to use prefolds, but most of the time I use what is known as the "angel wing fold," using a Snappi fastener to hold it together.
Believe it or not, in my home where I have a system down, I find this the easiest. Here's a play by play:

1. I lay baby on the changing table and grab a prefold out of the drawer and lay it flat under her.
2. With baby on the diaper, I "trifold" the bottom part with my right hand while holding her legs with my left hand. Her body keeps the top flared out.
3. Since I use stay-dry liners, I then hold baby's legs down to hold the diaper in place as a reach for a liner and then lift her up slightly to place it on the diaper. (I keep prefolds, liners, and covers in the top right drawer so that they are easy to grab.)
4. Next I lay baby's legs down, which continues to hold the diaper in place so that I can bring it up through her legs.
5. Continuing to hold diaper as shown with my left hand, I grab those little "wings" or "tabs" that you see on the side there with my right hand and slip them under my left thumb and forefinger that are already holding the diaper.6. With my right hand that is still free, I grab the snappi and put it on. To put on the Snappi, you put the claws on one side into the fabric and since it is rubbery, you just take the other side and pull it over and put the claws into the opposite wing of the diaper. Then you pull the bottom claw down and put it into the fabric.
7. Now your hands are free to grab a cover and put it on!(I used a Gen-Y cover in this picture because I've recently found that I LOVE these for using over a "snappied" prefold! The side snaps are great and I love the fabric!)


That is it! I hope this is helpful and assuages some one's fears of using prefold diapers!

Saturday, June 5, 2010

Homemade Cloth Wipes!

A friend gave me a recipe for homemade wipes using select a size paper towels. We used it at first and it worked well. The only unpleasant thing about it was cutting the roll of paper towels in half. (My sweet hubby did that for me! Otherwise it would not have happened.) However, as I got the hang of using cloth diapers and decided that I would definitely be using cloth all the time, I could see how it would be simpler and even less wasteful to just use cloth wipes as well.

I soon found out that you could make cloth wipes from flannel receiving blankets. We had been given quite a few of those, so I decided to try it. I read that you just had to cut squares, put them back to back, and zigzag stitch around the sides, that they would fray at the edges, but that they were for bum wiping for goodness sake!

Well, I guess that's where the choosy comes in. I didn't what them fraying at the edges. So, I sewed them front to front like little pillows, turned them right side out, and then did the zigzag around the edges. I didn't aim for perfection. They're all different sizes. I eye-balled the square cutting. The zigzag lines around the edges took a few detours, but they look great...from a distance anyway! They are, after all, only for bum wiping!


How to make cloth wipes:

1. Sew 2 squares together with the soft fuzzy sides facing each other, stopping before going all the way around so you have room to turn it back inside out. (Sorry I don't know "sew-ese." I guess these are "layman's terms."

2. Turn it inside out and use a pen or something pointy to get the corners completely turned. You can see the little opening I mentioned in step 1.

3.Fold the little opening in as evenly as possible. (When I started doing the zigzag stitch all the way around I started here to secure it in place.)


4. Put sewing machine on zigzag mode and try to follow the edges all the way around. (Of course I tried to be neater with this one since I was taking pictures! :)


5. Done!


It took a long time to finish them between feedings and all the many things a new mommy has to do, but eventually I had a nice size stash of wipes and some good practice sewing that straight line without having to worry about ruining something nice. The best part? They were free!

I keep a hand full at a time of them in a Sterilite container that seals shut. The solution I use is simple and cheap, of course. Here it is:

1.5 cups of boiling water
1Tbs Baby Oil
1Tbs Baby Soap (Such as Johnson & Johnson's Head to Toe)

Pour over wipes and that's it. Let them cool down before using of course!